Installing Proxmox VE and Initial Network Configuration on Dell Precision 7710
📚 Part 2 of the Series: Building a Scalable Home Lab
Context: This is Guide 2 in the Home Lab Migration Series. Following the successful backup of the Active Directory domain controller in Guide 1, this guide documents the installation and initial configuration of Proxmox VE on the Dell Precision 7710 workstation that will serve as the new primary hypervisor host.
Introduction
The migration to enterprise-grade hardware represented a critical infrastructure upgrade for the home lab environment. The Dell Precision 7710 workstation provided the computational resources necessary to support multiple concurrent virtual machines while maintaining performance standards suitable for enterprise service simulation.
This guide documents the installation of Proxmox VE 9.0.3 on the Dell Precision 7710, leveraging the established network infrastructure to implement proper static IP configuration during the initial setup process. Unlike previous installations on resource-constrained hardware, this deployment emphasized capacity planning and enterprise-grade configuration practices.
Hardware Assessment and Preparation
Target Hardware Specifications
The Dell Precision 7710 represented a substantial upgrade from the previous Proxmox host:
| Component | Dell Precision 7710 | Previous Host (Reference) |
|---|---|---|
| Processor | Intel i7-6920HQ (4C/8T, 2.9-3.8GHz) | Intel i3-2350M (2C/4T, 2.3GHz) |
| Memory | 32GB DDR4 | 7.7GB DDR3 |
| Architecture | 6th Gen Skylake | 2nd Gen Sandy Bridge |
| Form Factor | Mobile Workstation | Laptop |
| Virtualization | VT-x, VT-d supported | VT-x supported |
Hardware comparison showing 4.2x memory increase and 2x core count improvement
Pre-Installation Hardware Verification
Before beginning the Proxmox installation, several hardware assessments were performed:
- Memory Configuration Verification:
- Confirmed 32GB DDR4 installation across available DIMM slots
- Verified memory recognition in BIOS/UEFI interface
- Documented maximum supported capacity for future expansion planning
- Storage Assessment:
- Confirmed recognition of 1TB NVMe SSD installation in BIOS/UEFI
- Verified NVMe recognition and boot priority in BIOS/UEFI
- Assessed storage capacity requirements for multiple VM deployments
- Network Interface Verification:
- Confirmed Gigabit Ethernet interface functionality
- Tested physical connectivity to Cudy GS1016E managed switch
- Verified cable integrity and port assignment (Port 5 - VLAN 30)
Proxmox VE Installation Process
Installation Media Preparation
The Proxmox VE 8.x ISO was downloaded from the official Proxmox website and prepared using Rufus utility. For detailed steps on creating the bootable USB drive, including the critical DD Image mode selection, reference the original Proxmox installation guide.
This guide uses Proxmox VE 9.0, the latest stable release at the time of writing. The Rufus workflow remains consistent across recent versions (8.x and 9.x), so these steps apply broadly. Note: Newer Proxmox ISOs may not trigger the DD Image mode prompt in Rufus—this is expected behavior. Rufus will automatically apply DD mode when required, and the write process remains valid for installation.
Important: If prompted, ensure DD Image mode is selected in Rufus when creating Proxmox installation media. This is especially critical on Windows systems to avoid installation failures.
UEFI Configuration
The Dell Precision 7710 UEFI was configured to optimize virtualization performance:
- Virtualization Technology Settings:
- Intel Virtualization Technology: Enabled
- VT for Direct I/O: Enabled (for hardware passthrough capabilities)
- Boot Configuration:
- UEFI boot mode confirmed
- Secure Boot disabled for Proxmox compatibility
- Windows Boot Manager: Disabled (to prevent conflicts)
- UEFI: PC711 NVMe (original drive): Disabled temporarily
- USB boot priority configured for installation media
Security Note: Secure Boot was disabled for Proxmox VE compatibility. Unlike Windows systems, Proxmox does not support Secure Boot and will fail to boot if re-enabled. This configuration is correct and should remain disabled for proper hypervisor operation. In enterprise environments, consider implementing additional security measures such as LUKS disk encryption and strong authentication policies to maintain security standards without Secure Boot.
** Enterprise Security:** In enterprise environments, consider implementing additional security measures such as LUKS disk encryption and strong authentication policies to maintain security standards without Secure Boot.
Installation Boot Process
With UEFI settings configured, the system was prepared for Proxmox installation:
- USB Drive Connection and Boot:
- Proxmox installation USB inserted into available USB port
- System restarted and automatically recognized Proxmox USB due to boot priority configuration
- Installation environment loaded successfully without manual intervention
Proxmox VE Installation Process
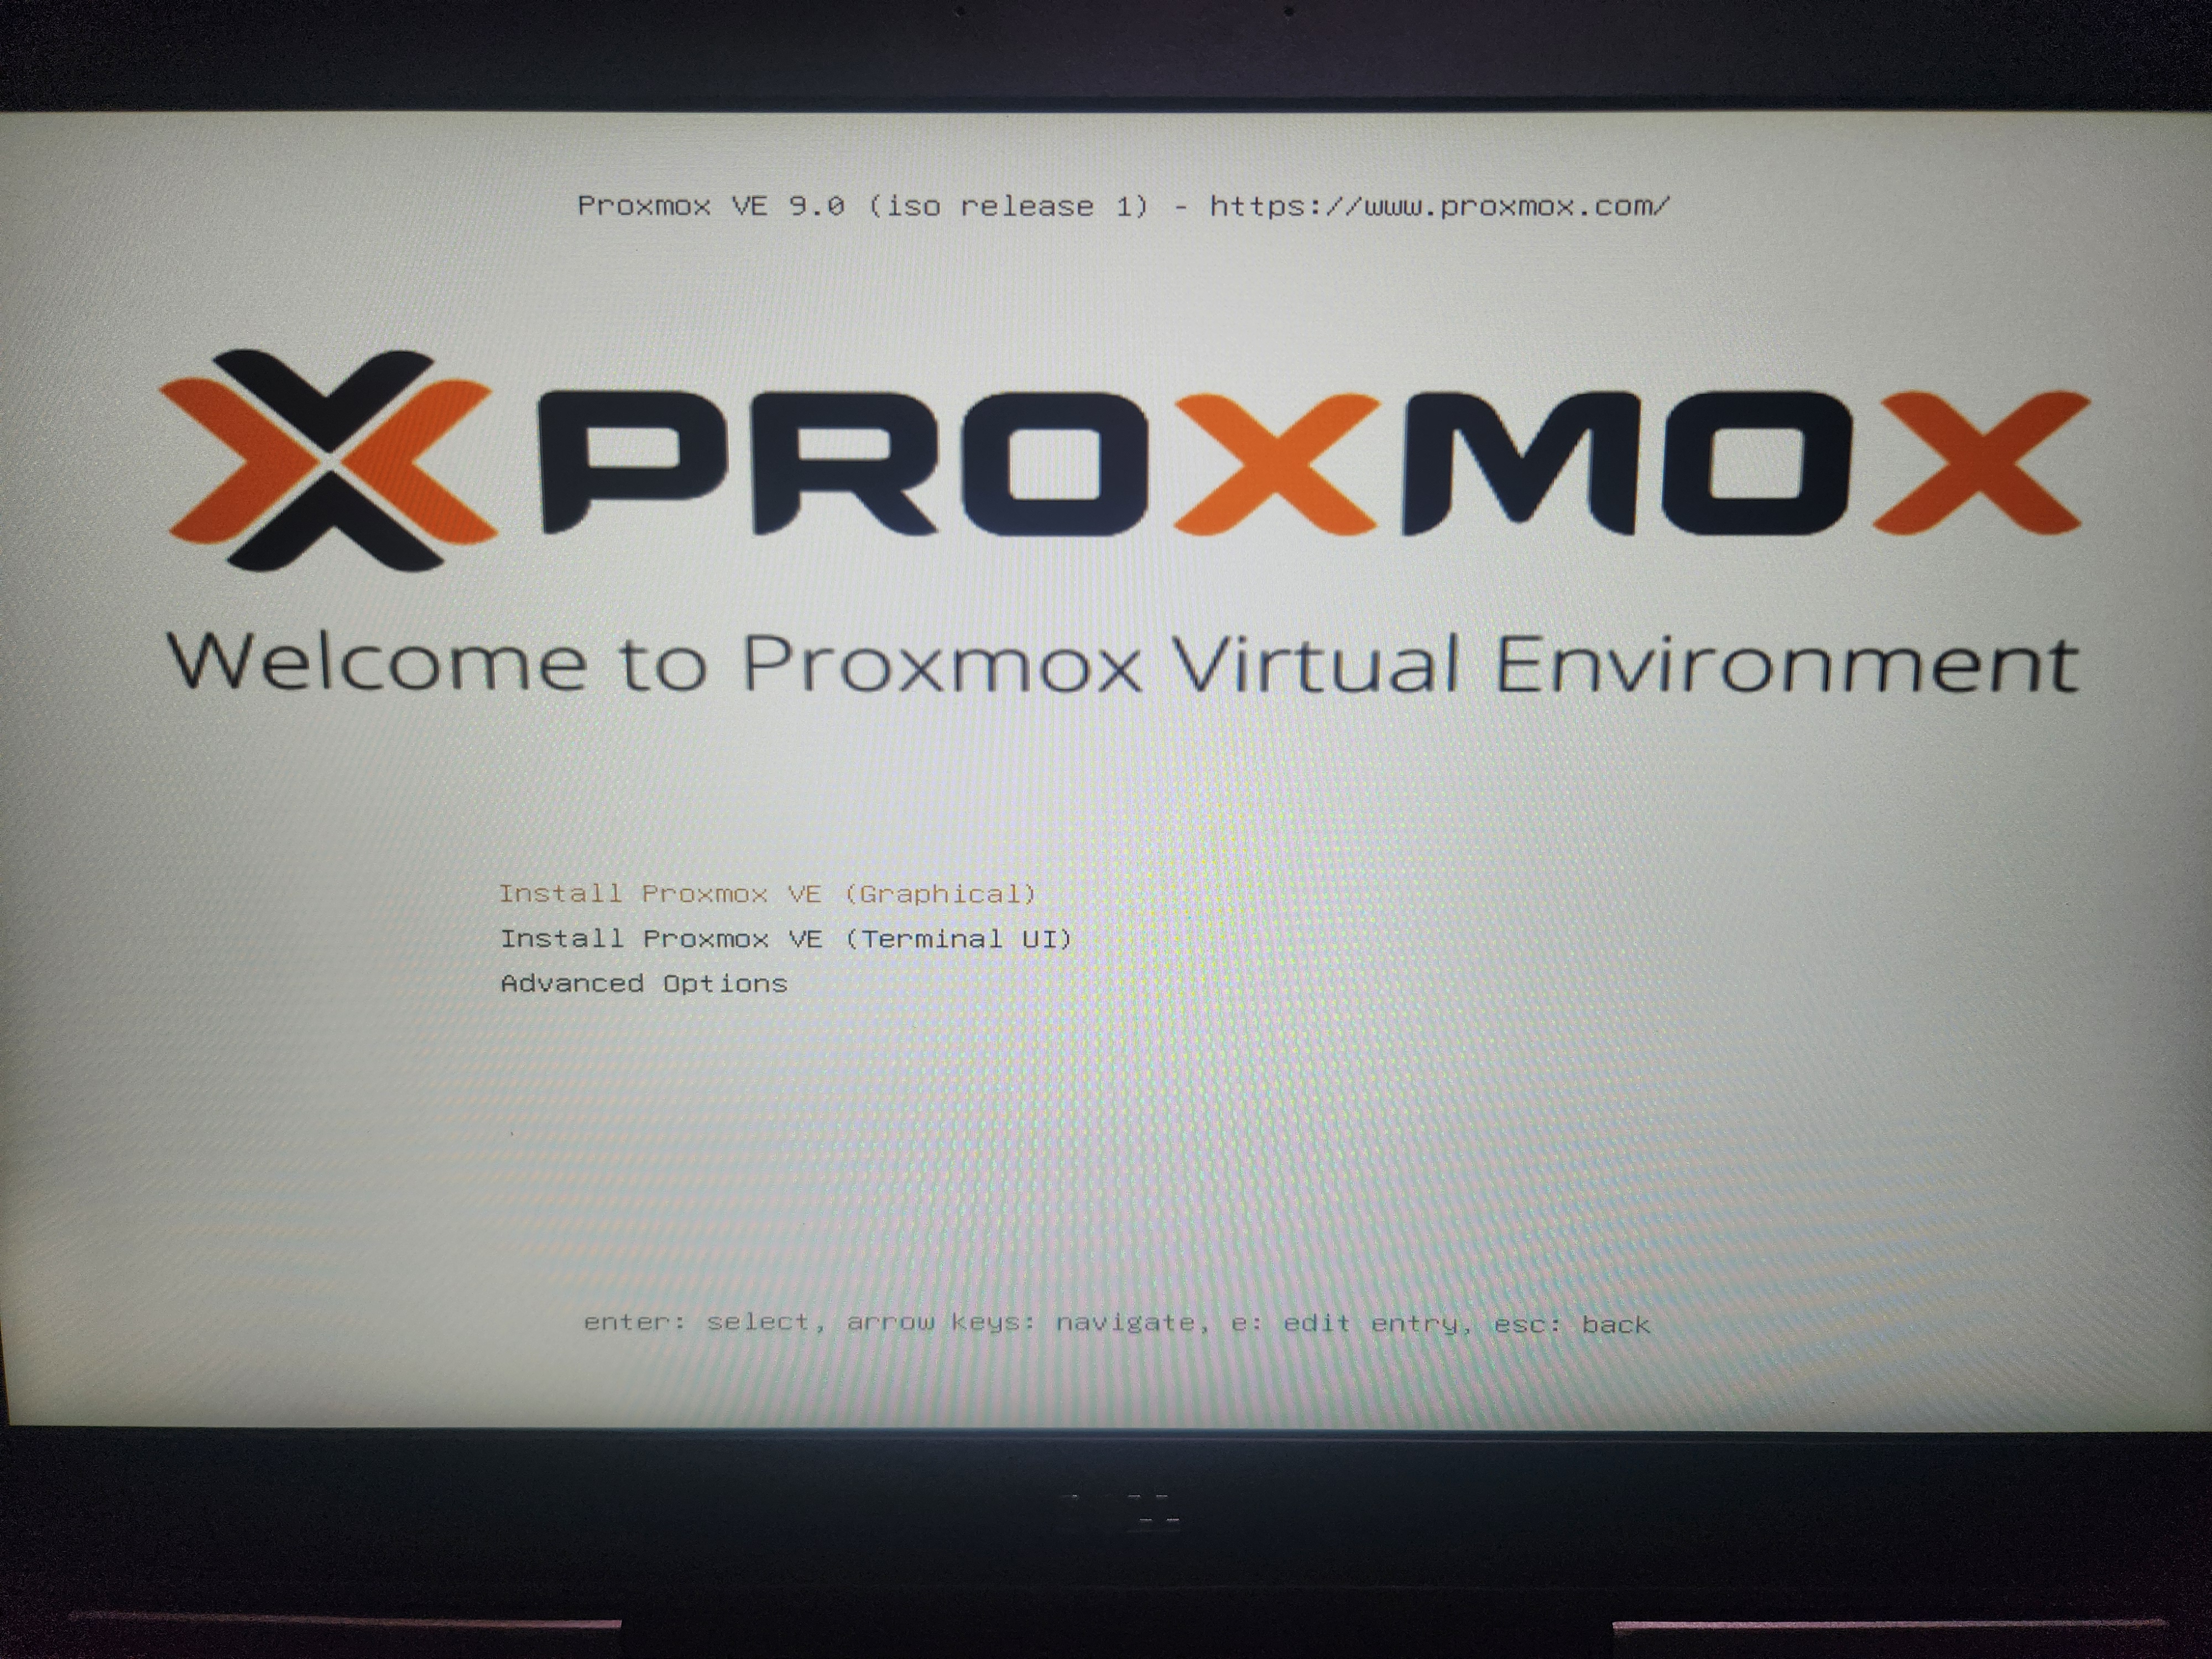 Figure 1: Proxmox VE installation welcome screen showing graphical installation option
- Installation Mode Selection:
- Selected Install Proxmox VE (Graphical) for full web UI access
- Graphical mode provides complete management interface versus terminal-only options
- End User License Agreement:
- Reviewed and accepted Proxmox VE EULA terms
- Clicked I agree to proceed with installation
- Target Disk Selection:
- Primary NVMe SSD identified and selected for installation
- Confirmed data destruction acknowledgment for clean installation
Tip: The target disk selection dropdown appears at the bottom of the screen and can be easily overlooked. This is critical when multiple drives are present - ensure the correct NVMe SSD is selected before proceeding.
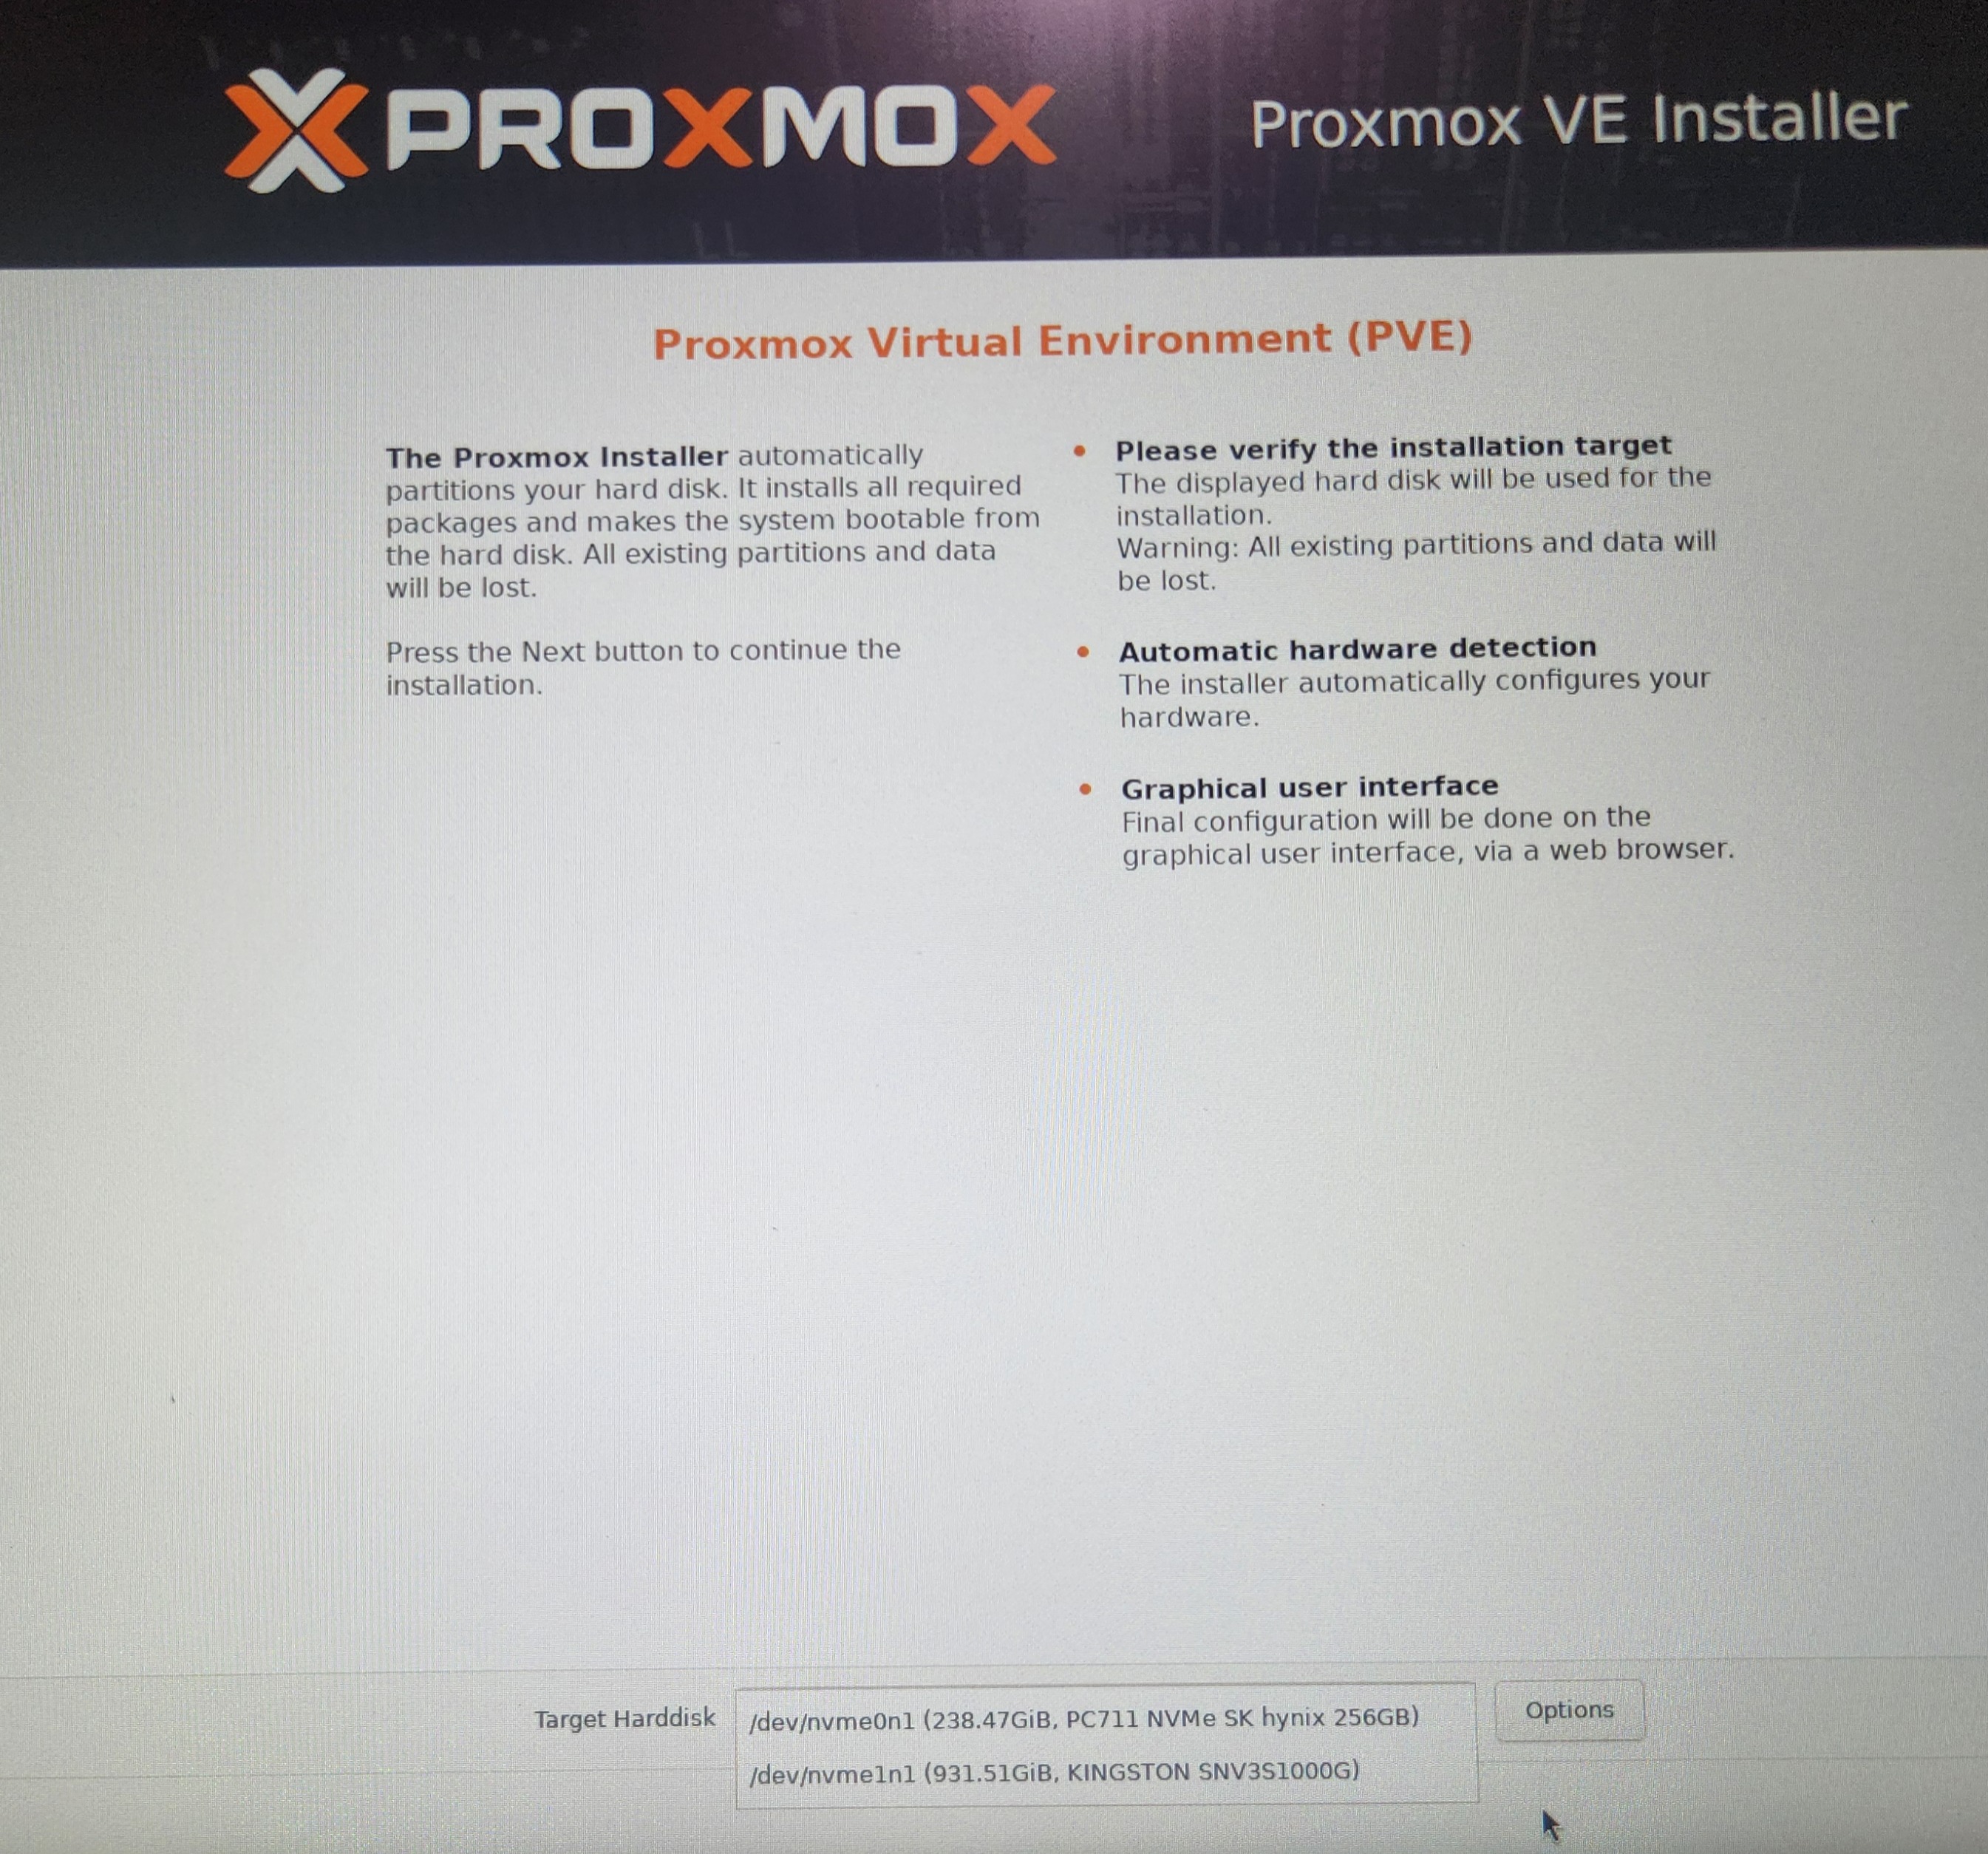 Figure 2: Target disk selection showing Dell Precision 7710 primary storage device
- Location and Time Zone:
- Country: United States
- Time Zone: America/Los_Angeles (Pacific Time)
- Keyboard Layout: U.S. English
- Administrator Account Configuration:
- Root password configured following enterprise password complexity requirements
- Administrative email address specified for system notifications
Network Configuration During Installation
Despite the established network infrastructure, the Proxmox installer did not automatically detect the correct network settings. This behavior is common in more complex environments utilizing VLANs, where tagged traffic and switch port configurations can prevent the installer from communicating with devices outside the default network. Although Proxmox can typically detect active Ethernet interfaces when connected to a live network, VLAN segmentation often requires manual configuration. As a result, static IP assignment was necessary during installation to ensure the Proxmox host was properly integrated into the designated VLAN.
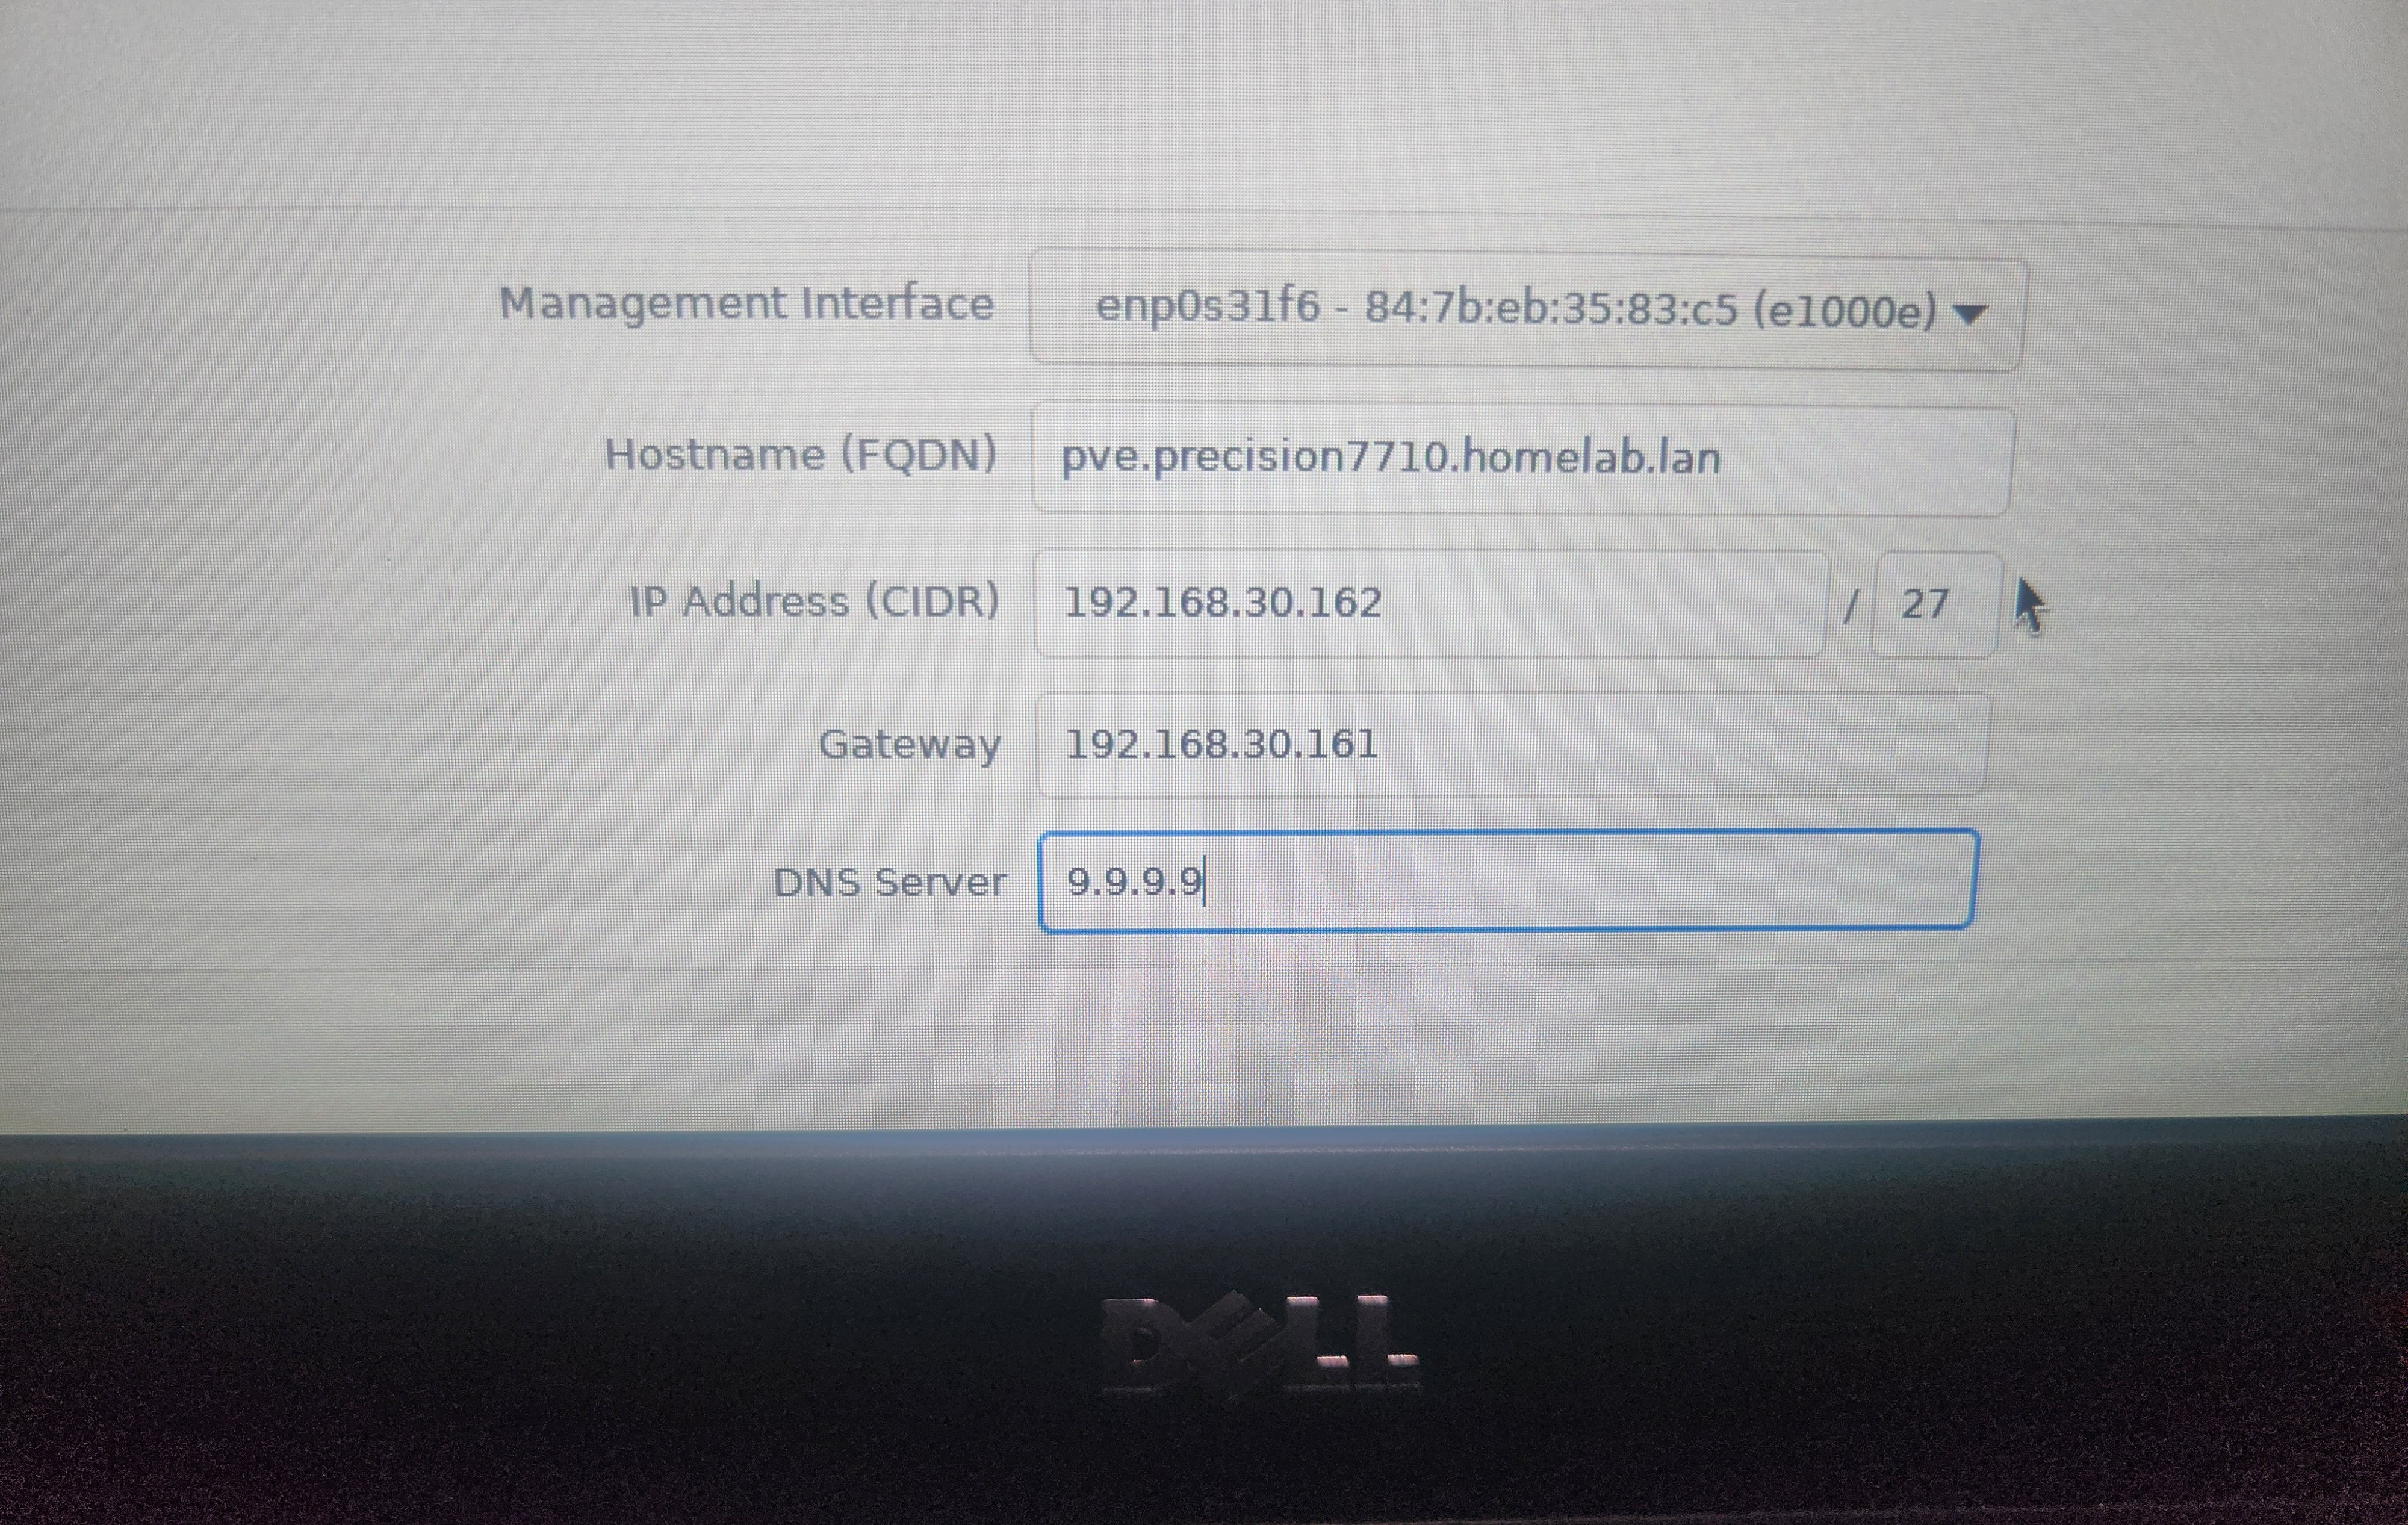 Figure 3: Management network configuration with static IP assignment
Network Settings Applied:
- IP Address: 192.168.30.162/27 (VLAN 30 - transitioning to Server VLAN)
- Gateway: 192.168.30.161 (TP-Link Er605 router interface for VLAN 30)
- DNS Server: 9.9.9.9 (Quad9 DNS used instead of ISP gateway for enhanced privacy and threat blocking)
- Hostname: pve-precision7710.homelab.lan
Note: The static IP assignment uses VLAN 30 on switch Port 5. This VLAN will be transitioned from Tech Support to Server infrastructure use, with VLAN 60 becoming the new Tech Support VLAN in subsequent guides. Once pfSense is deployed, DNS resolution will be handled by pfSense at the gateway address.
Final Installation Summary & Disk Warning
Before clicking Install, Proxmox presents a summary screen displaying all selected configuration options—including target disk, hostname, IP settings, and root credentials. It’s critical to review this screen carefully, especially the disk selection.
Warning: Proceeding with installation will erase and format the selected disk. All existing data—including previous operating systems—will be permanently lost. Double-check that the correct drive is selected before continuing.
Once confirmed, clicking Install begins the partitioning and setup process. This step finalizes the base system and prepares the host for post-install configuration.
Post-Installation Configuration
Initial System Access and Verification
Following the successful installation and automatic reboot, the system presented a login prompt on the Dell Precision 7710 console:
- Console Login:
- Username:
root(default administrative account) - Password: [Password configured during installation process]
- Username:
- Web Interface URL Display:
- Upon successful console login, the Proxmox web interface URL was displayed at the top of the terminal
- Access URL:
https://192.168.30.162:8006
- Web Interface Access:
- Navigated to the displayed URL in web browser
- Login credentials: Same root username and password from console login
Tip: If browser security warnings prevent access to the Proxmox web interface, add the URL to your browser’s HTTPS certificate exception list. This is expected behavior since Proxmox uses self-signed certificates by default.
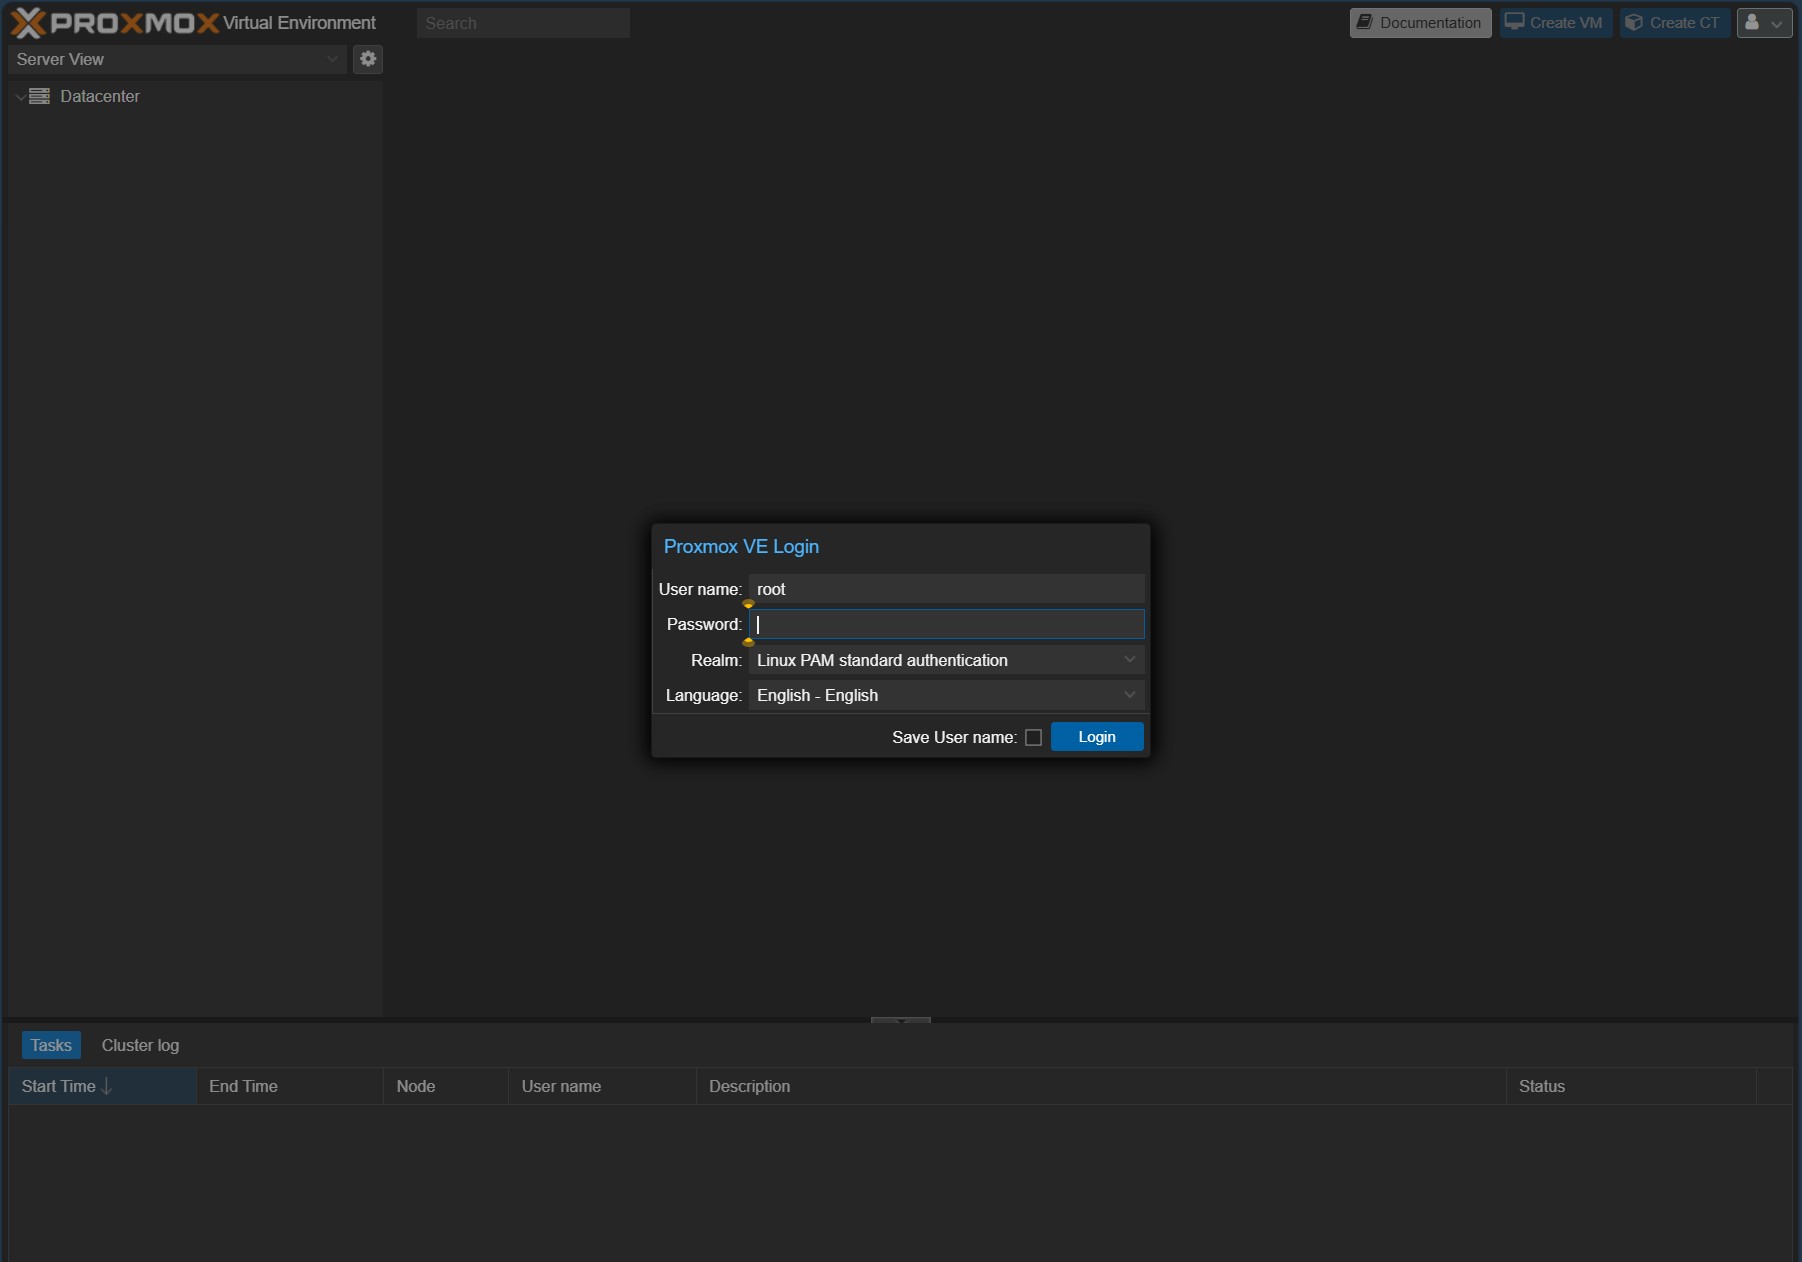 Figure 4: Proxmox VE web interface login screen confirming successful network configuration
Repository Configuration for Non-Subscription Environment
Warning: Repository configuration differs between Proxmox VE versions. Version 9.0+ uses the new Deb822 format (.sources files) while older versions use the traditional format (.list files). Using incorrect commands for your version will result in configuration errors.
To prevent package management errors, the default Proxmox repositories were updated to use the no-subscription sources. Access the Proxmox shell through the web interface: Datacenter → pve-precision7710 → Shell.
For Proxmox VE 8.x and older versions:
1
2
3
4
5
6
7
8
9
10
11
12
13
14
# Edit sources list to disable enterprise repository
nano /etc/apt/sources.list.d/pve-enterprise.list

# Comment out enterprise repository line
# deb https://enterprise.proxmox.com/debian/pve bookworm pve-enterprise

# Add no-subscription repository
echo "deb http://download.proxmox.com/debian/pve bookworm pve-no-subscription" >> /etc/apt/sources.list

# Add Debian security updates repository
echo "deb http://security.debian.org/debian-security bookworm-security main contrib" >> /etc/apt/sources.list

# Update package lists
apt update
For Proxmox VE 9.0+ (current installation):
1
2
3
4
5
6
7
8
9
10
11
12
13
14
15
16
17
18
# Edit sources file to disable enterprise repository (Deb822 format)
nano /etc/apt/sources.list.d/pve-enterprise.sources

# Comment out all lines in the enterprise repository block:
# Types: deb
# URIs: https://enterprise.proxmox.com/debian/pve
# Suites: trixie
# Components: pve-enterprise
# Signed-By: /usr/share/keyrings/proxmox-archive-keyring.gpg

# Add no-subscription repository
echo "deb http://download.proxmox.com/debian/pve trixie pve-no-subscription" >> /etc/apt/sources.list

# Add Debian security updates repository
echo "deb http://security.debian.org/debian-security trixie-security main contrib" >> /etc/apt/sources.list

# Update package lists
apt update
To determine your Proxmox version, check the banner in the web interface or run pveversion in the shell. If opening a .sources file appears blank initially, the Deb822 format content may start below the first visible lines.
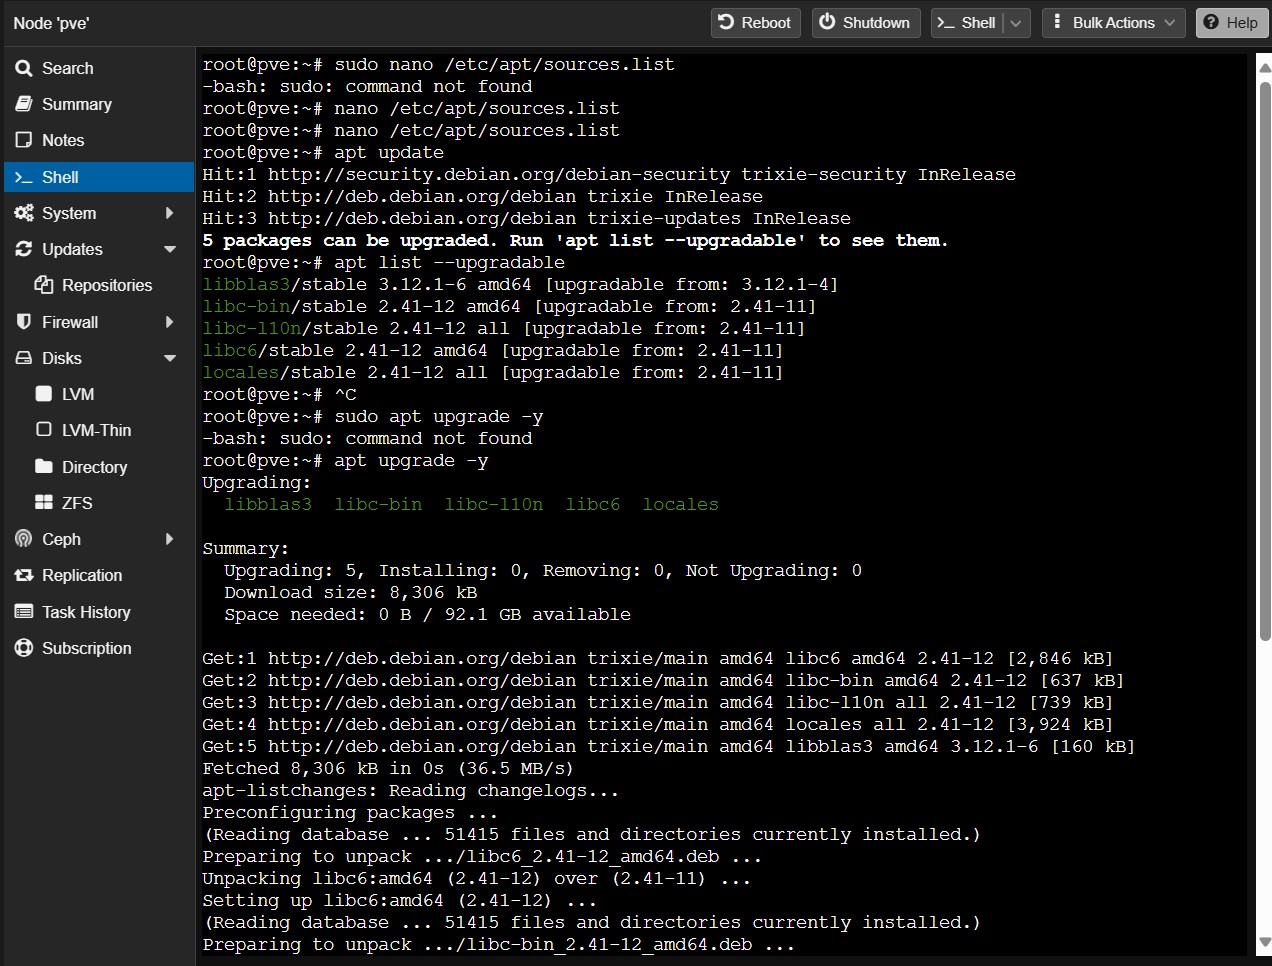 Figure 5: Terminal output confirming successful repository configuration and package upgrades in Proxmox VE
System Resource Verification
The Proxmox dashboard was accessed to confirm optimal resource allocation for the enterprise hardware. Navigate to Datacenter → pve → Summary to view system metrics.
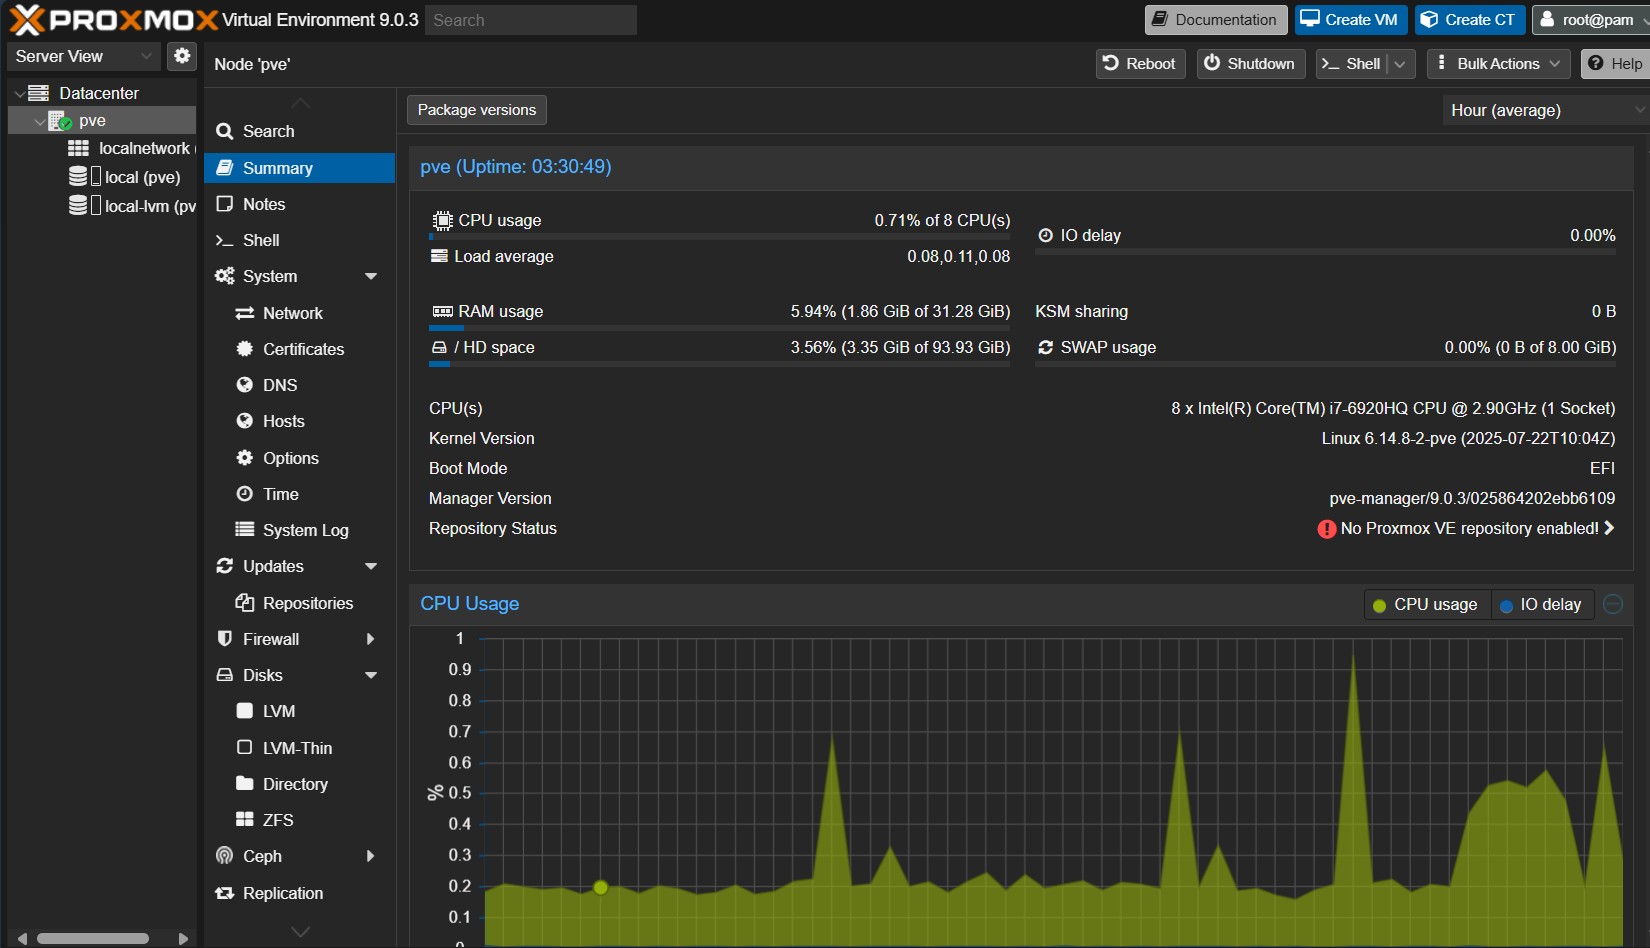 Figure 6: Proxmox resource utilization dashboard showing available capacity for VM deployment
Resource Summary:
- CPU Utilization: 0.71% of 8 CPUs (Intel i7-6920HQ at 2.90GHz, 1 Socket)
- Load Average: 0.08, 0.11, 0.08 (1, 5, 15 minute averages)
- Memory Usage: 5.94% (1.86GB used of 31.28GB available)
- Storage: 3.56% (3.35GB used of 93.93GB available)
- I/O Delay: 0.00% (optimal storage performance)
- SWAP Usage: 0.00% (0B of 8.00GB)
- System Uptime: 03:30:49
- Boot Mode: EFI
- Kernel Version: Linux 6.14.8-2-pve
The substantial available resources (94.06% memory and 96.44% storage available) confirmed the hardware upgrade provided adequate capacity for planned VM deployments with significant headroom for future expansion.
Best Practice: System baseline metrics were documented following the 3-2-1 backup rule, with copies maintained in this GitHub portfolio guide in local documentation spreadsheets and backed up to external storage for future capacity planning reference.
Network Infrastructure Integration
VLAN Configuration Verification
The Proxmox host’s successful integration into the existing VLAN structure during the installation was verified using the Proxmox shell:
1
2
3
4
5
6
# Confirm VLAN connectivity using -c switch to limit ping result count
ping -c 4 192.168.30.161  # Gateway connectivity test
ping -c 4 9.9.9.9         # External DNS connectivity test

# Verify network interface configuration
ip addr show
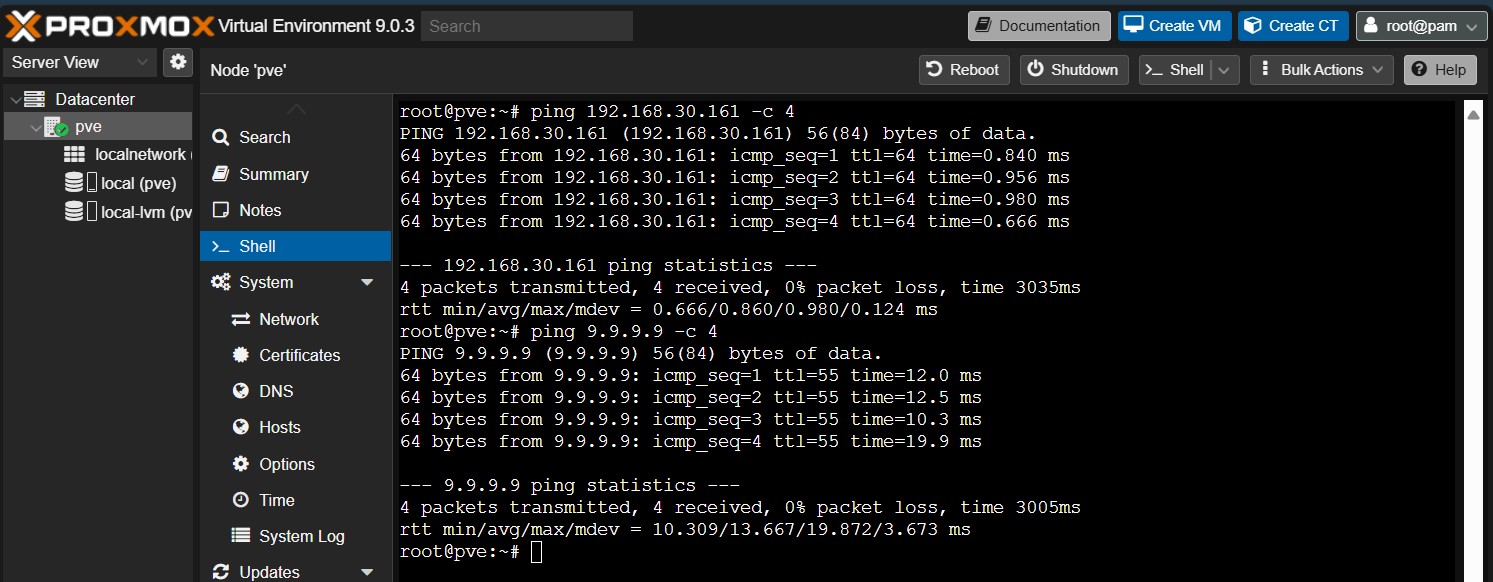 Figure 7: Network connectivity tests confirming proper VLAN integration and internet access
Network Bridge Configuration Verification
The default network bridge was automatically configured during installation. While verified above using ip addr show, bridge settings can also be reviewed through the web interface: System → Network.
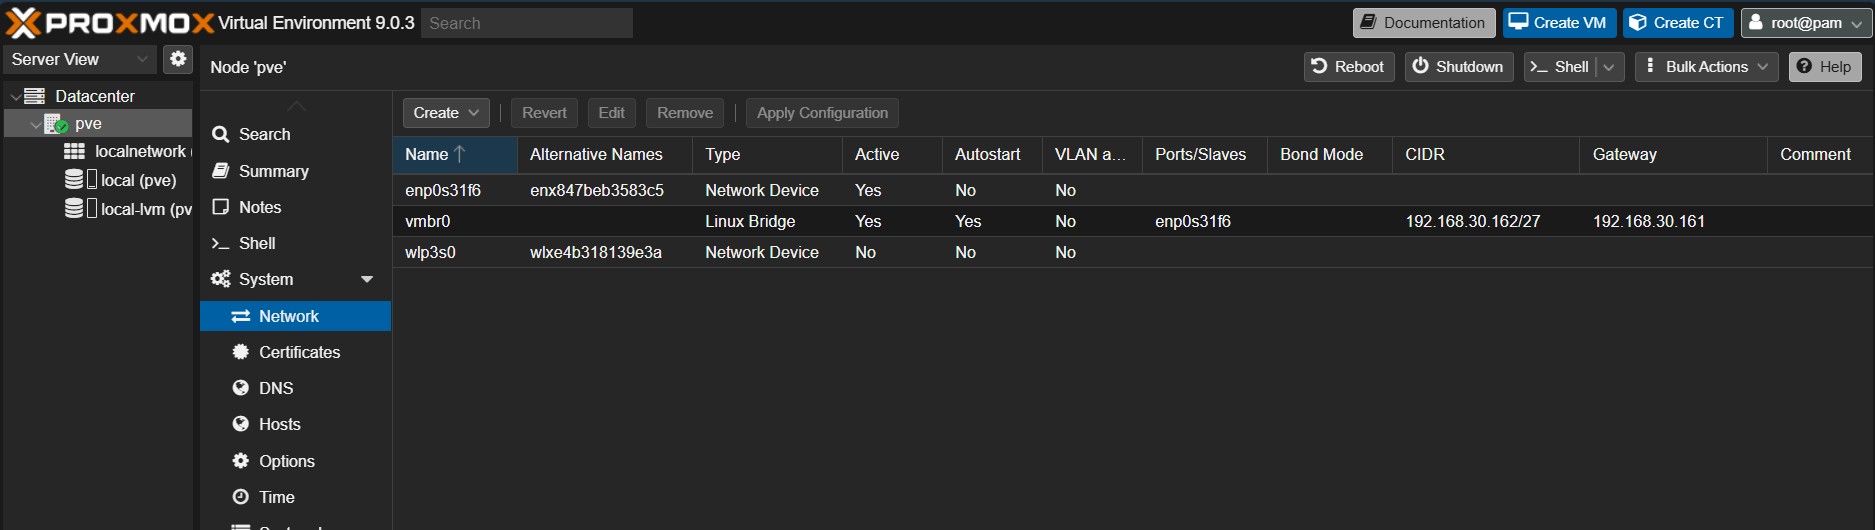 Figure 8: Default network bridge vmbr0 configuration confirming VM connectivity capabilities
Bridge Configuration Confirmed:
- Interface: vmbr0 (default VM bridge)
- Bridge Ports: enp0s31f6 (physical Ethernet interface)
- IP Address: 192.168.30.162/27 (static configuration from installation)
- Gateway: 192.168.30.161
- Autostart: Enabled
System Optimization Notes
The upgraded hardware configuration provided optimal performance characteristics:
Storage Performance: The 1TB NVMe SSD installation completed in Guide 1 provided substantial I/O performance improvements over traditional storage, enabling faster VM deployment and reduced boot times.
Memory Allocation: With 32GB total capacity, initial VM deployments will be sized conservatively (4-6GB per VM) with monitoring for optimal resource distribution.
Secondary Storage Configuration for System Backup
The following shell commands were used to identify the correct NVMe device, erase any existing filesystem signatures, and format it for dedicated backup use. After confirming the successful mount, the disk management interface was accessed via the Proxmox web GUI to visually verify the configuration: Datacenter → pve → Disks
Tip: ALways use
lsblkoutput to confirm device names before proceeding. NVMe devices may appear in different orders depending on installation sequence and hardware detection.
1
2
3
4
5
6
7
8
9
10
11
12
13
14
15
16
17
18
19
20
21
22
23
24
25
26
27
28
29
# Identify available storage devices
lsblk

# Verify secondary NVMe device recognition
fdisk -l | grep nvme

# Initialize the secondary drive for backup use
wipefs -a /dev/nvme0n1

# Create GPT partition table
parted /dev/nvme0n1 mklabel gpt

# Create primary partition using full capacity
parted /dev/nvme0n1 mkpart primary ext4 0% 100%

# Format partition with ext4 filesystem
mkfs.ext4 -L "proxmox-backup" /dev/nvme0n1p1

# Create mount point for backup storage
mkdir -p /mnt/backup-storage

# Add permanent mount entry
echo "/dev/nvme0n1p1 /mnt/backup-storage ext4 defaults 0 2" >> /etc/fstab

# Mount the backup storage
mount -a

# Verify successful mount
df -h | grep backup-storage
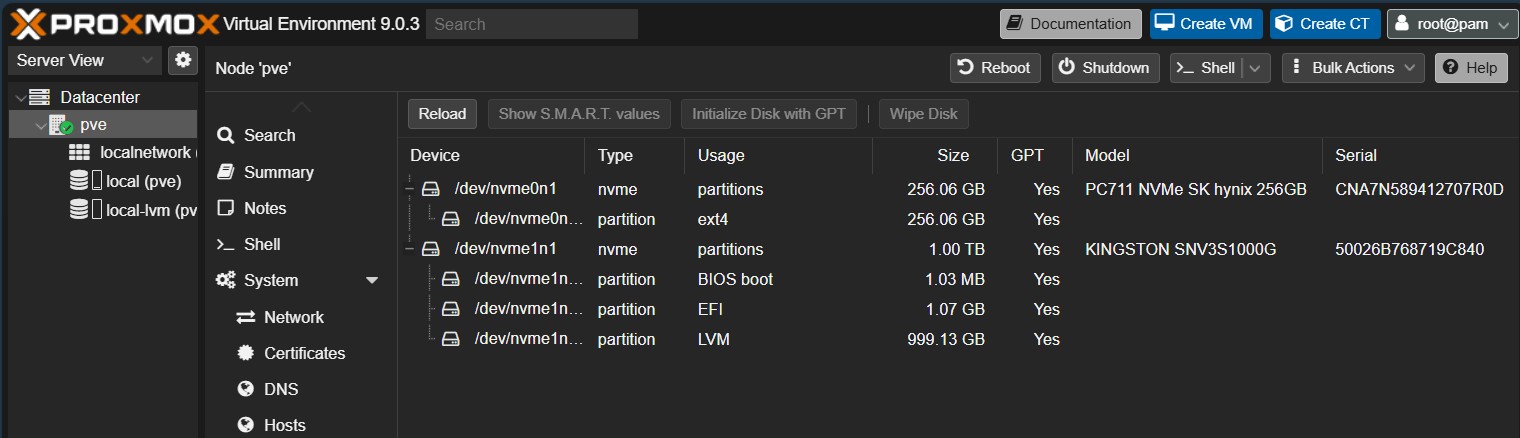 Figure 9: Secondary NVMe storage configuration showing dedicated backup partition
Storage Architecture Benefits:
- Dedicated Backup Storage: 238.5GB capacity reserved exclusively for system backups
- Performance Isolation: NVMe performance characteristics maintained for backup operations
- Recovery Resilience: Separate physical storage reduces single-point-of-failure risk
- Capacity Planning: Adequate space for multiple Proxmox system snapshots and VM exports
This backup storage configuration established the foundation for implementing comprehensive system protection before proceeding with virtual machine deployments.
Integration Preparation for pfSense Deployment
Network Architecture Planning
The Proxmox installation established the foundation for implementing pfSense as the primary firewall and router in Guide 3:
Planned Network Transition:
- Current: Direct connection to TP-Link Er605 router
- Future: pfSense VM handling routing with Er605 in bridge mode
- VLAN management transition from hardware switch to pfSense virtual interfaces
VM Resource Allocation Strategy
Based on the hardware capacity assessment, initial resource allocation was planned:
| Service | Planned vCPUs | Memory (GB) | Storage (GB) | Priority |
|---|---|---|---|---|
| pfSense | 2 | 4 | 20 | Critical |
| Windows Server AD | 4 | 8 | 60 | High |
| Azure AD Connect | 2 | 4 | 40 | Medium |
| Future Services | 4 | 16 | 100+ | Variable |
Planned VM resource allocation maintaining 25% host resource reservation
Key Learnings and Takeaways
The installation of Proxmox VE on the Dell Precision 7710 demonstrated several important concepts for enterprise virtualization deployment:
Infrastructure Scaling Benefits: The hardware upgrade from 7.7GB to 32GB memory and dual-core to quad-core processing provided the computational foundation necessary for realistic enterprise service simulation. This capacity increase enabled concurrent operation of multiple Windows Server instances with realistic resource allocation.
Network Integration Practices: Unlike previous installations requiring post-deployment network configuration, having established network infrastructure allowed for proper static IP assignment during installation. This approach aligns with enterprise deployment practices where network parameters are predetermined and configured systematically.
Capacity Planning Methodology: The baseline performance documentation established measurable metrics for evaluating system performance as VM workloads were added. This approach demonstrated proactive monitoring practices essential for production environment management.
Storage Architecture Planning: The implementation of dedicated backup storage on secondary NVMe demonstrated enterprise-grade storage separation principles. This approach provided both performance benefits and reduced risk through hardware redundancy, essential for production virtualization environments.
Enterprise Hardware Advantages: The Dell Precision 7710’s workstation-grade components, including support for Intel VT-d and substantial memory capacity, provided capabilities that consumer laptops could not match. These features enabled advanced virtualization scenarios including potential hardware passthrough configurations.
The successful Proxmox installation established a robust foundation for the remaining migration series guides, particularly the pfSense firewall deployment and Active Directory domain controller migration planned for subsequent phases.