Proxmox VE Hypervisor Configuration Guide
Context: This guide covers the installation and initial setup of the Proxmox VE hypervisor, the virtualization platform for the home lab. This step follows the initial network planning and prepares the host machine for the Windows Server virtual machine.
Introduction
To gain experience with enterprise-relevant virtualization, I chose to build my home lab environment using Proxmox VE, a Type-1 hypervisor. My research indicated its operational similarity to VMware’s ESXi, a common platform in the business world, making the skills gained with Proxmox directly transferable.
For a home lab, Proxmox offered several key advantages over ESXi:
- Open-source: It’s free and provides many features that are behind a paywall in ESXi.
- Hardware Compatibility: It tends to have fewer compatibility issues with consumer-grade hardware.
Given the project timeline, I started the Proxmox installation before all my networking hardware (router, switch) had arrived. This meant I initially had to skip the static IP configuration step during the setup wizard. While this created a challenge later, it also provided a valuable opportunity to work directly with the Debian-based Linux terminal to manually configure the network, reinforcing concepts from my IT-138, UNIX for Network Administration coursework.
Initial Setup & Preparation
- Hardware Selection & Upgrade:
- After researching the requirements for both Proxmox and Microsoft Server, I repurposed an old laptop for the project.
- The laptop met the minimum requirements but had a slow HDD. For better performance, and to follow suggested hardware requirements, I removed the HDD and replaced it with a new SSD.
- I also upgraded the memory to the maximum supported by the motherboard.
8GB.
- Creating a Bootable Proxmox USB Drive:
1
2
3
4
5
6
* First, I downloaded the latest stable Proxmox VE `.iso` file from the official [Proxmox downloads page](https://www.proxmox.com/en/downloads).
* Since my laptops lack CD drives, I used a tool to write the ISO file to a flash drive. I chose **Rufus**, a utility I have previous experience with.
* After opening Rufus, I clicked <kbd>SELECT</kbd> and chose the Proxmox `.iso` file I had downloaded.

*Figure 1: Selecting the Proxmox ISO file in the Rufus utility.*
When using the Rufus utility to install Proxmox on a Windows OS, use the DD Image Mode option.
- A pop-up box prompts for the write mode. If using a Windows OS, it is crucial not to use the recommended “ISO Image mode”, which is checked by default. Instead, I selected DD Image mode, as this is required for a successful Proxmox installation from USB.
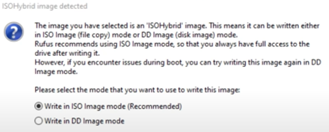 Figure 2: Choosing DD Image mode instead of the default ISO mode.
- Finally, I clicked through the subsequent warnings about data on the flash drive being destroyed to complete the bootable USB creation process.
Proxmox VE Installation
- Booting from USB & Initial Steps:
- To begin the installation, I booted the laptop into its UEFI/BIOS and changed the boot order to prioritize the USB flash drive.
- On restart, the Proxmox VE welcome screen appeared. I chose the option Install Proxmox VE.
- After agreeing to the EULA, the installer prompted me to choose the target drive for installation. My only drive was the new SSD, which the installer correctly identified.
Note: If you are following a similar setup, be aware that this process will overwrite the entire target disk, replacing the existing OS (like Windows) with the Debian Linux distribution that Proxmox is built upon.
- Admin and Network Configuration:
- After setting the location and time zone, the next screen prompted for the administrator password and email address. This password is for the
rootuser and is used to log in to the Proxmox web GUI. - The next screen was the Management Network Configuration. Because my lab network wasn’t yet established, Proxmox couldn’t automatically acquire network settings. I manually entered a temporary static IP address I knew was free on my existing home network, along with the corresponding gateway and DNS server info.
- If the network hardware had been in place and connected via RJ45, this information would have been automatically detected.
- After setting the location and time zone, the next screen prompted for the administrator password and email address. This password is for the
- Finalizing Installation & Post-Install Tasks:
- After clicking Next, the installation process began. Once complete, the system rebooted into the Proxmox command-line interface. The console displays the URL for accessing the web GUI, which is
https://<your-proxmox-ip>:8006.Switch to no subscription repositories if you do not have a paid subscription.
- Crucial Post-Install Step: For any new Proxmox installation that isn’t using a paid subscription, it’s essential to switch to the “no-subscription” repositories. Failing to do this can cause
apt-get updateerrors, which can corrupt package management and affect running VMs. I encountered this later when setting up my Active Directory server.- GUI Method: How to update Proxmox with No-Subscription Repository
- Terminal Method: Proxmox Update No Subscription Repository Configuration
- After clicking Next, the installation process began. Once complete, the system rebooted into the Proxmox command-line interface. The console displays the URL for accessing the web GUI, which is
Manual Network Configuration (Post-Setup)
Once my TP-Link router and Xnyahitog switch were configured for the new lab network, I needed to update the Proxmox host with the correct network information.
- Initial Attempt: My first thought was that simply plugging the Proxmox host into the correctly configured switch port might allow it to auto-detect the new network. This did not work; the network configuration must be set either during installation or manually via the command line.
- Manual CLI Configuration: Since I couldn’t access the web GUI on the new network, I logged directly into the Proxmox host’s terminal and performed the following steps:
- Modified the
/etc/network/interfacesfile to configure the vmbr0 bridge. This is the virtual switch that Proxmox uses for its management interface. I used the commandsudo nano /etc/network/interfaces.Note: My first attempt was to configure the physical adapter (
enp3s0), but this did not work. Proxmox networking relies on thevmbr0virtual bridge, which is bonded to the physical NIC. All static IP configurations must be applied to this bridge. Within the
interfacesfile, I set the staticaddress,netmask, andgatewayto match the details of the reserved IP I configured for the Proxmox host on my TP-Link router.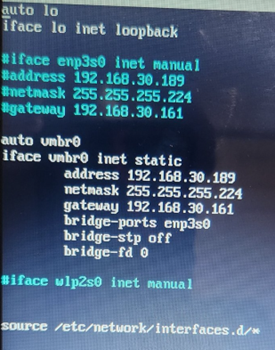 Figure 3: Configuring the vmbr0 bridge with the new static network information.
- After saving the file in
nano, I applied the changes by restarting the networking service with the commandsystemctl restart networking.
- Modified the
Key Learnings & Takeaways
Installing Proxmox VE was a largely straightforward process, though my project timeline required an unconventional workflow. Having to install the hypervisor before the network was finalized led to a valuable hands-on exercise in manual Linux network configuration. This experience directly reinforced my command-line skills and understanding of Linux networking files, bridging the gap between classroom theory and practical application.
Despite the initial challenges, the Proxmox hypervisor was successfully installed and configured, establishing the core foundation for running Microsoft Server and other services in my home lab. Future steps will involve creating and managing VMs, exploring Proxmox’s advanced features like backups and clustering, and further refining the network setup.