Microsoft Server 2022 Installation on Proxmox VE
Context: This guide details the process of creating a Windows Server 2022 virtual machine on the previously configured Proxmox host. It covers VM creation, driver installation, and initial server setup, preparing it for its role as a Domain Controller.
Introduction
After successfully installing the Proxmox hypervisor and configuring its network settings, I proceeded to install Microsoft Server 2022 as a virtual machine (VM).
During this process, I encountered a separate troubleshooting challenge: while the Proxmox web GUI was accessible from other devices on my network, it was unreachable from my main PC. After initial network diagnostics (ping, tracert..) and browser testing, I isolated the cause to my PC’s local firewall. The solution involved creating a new outbound rule in Windows Defender Firewall for the Proxmox port (8006) and refreshing the network adapter. Detailed troubleshooting steps are in the Troubleshooting section.
Initial Setup: Required Files
Before creating the VM, two sets of files need to be downloaded: the Windows Server 2022 ISO and the VirtIO drivers for virtualized hardware compatibility.
- Download Windows Server 2022 ISO:
- Download the 64-bit ISO image of Windows Server 2022 from the official Microsoft Evaluation Center.
- Main Page (with instructions): Windows Server 2022 - Microsoft Evaluation Center
- Direct ISO Download Page: Windows Server 2022 Trial
- Download the 64-bit ISO image of Windows Server 2022 from the official Microsoft Evaluation Center.
- Download VirtIO Drivers for KVM:
These drivers are required by Proxmox for the VM to recognize virtualized hard disks and network interfaces. Without them, the Windows installer will not be able to find any drives to install to.
- Standard Method: Download the latest stable
virtio-win-XX.isofile from the official project page: Windows VirtIO Drivers - Proxmox VE
Alternative Method: A quicker method is to download the ISO directly from the Proxmox UI.
- To do this, right-click the download link on the VirtIO driver page and select “Copy Link”. In the Proxmox UI storage view, select Download from URL, paste the link into the URL field, click Query URL, and then download the file.
- Standard Method: Download the latest stable
Configuration Steps
1. Upload ISO Files to Proxmox
- Navigate to Storage: In the Proxmox Web UI, access your server and navigate to the Storage section in the left pane.
- Upload Files:
- In the middle pane, select ISO Image, then click the Upload button.
- In the pop-up window, click Select File and choose the Windows Server 2022 ISO you downloaded.
- Repeat the process for the VirtIO drivers ISO.
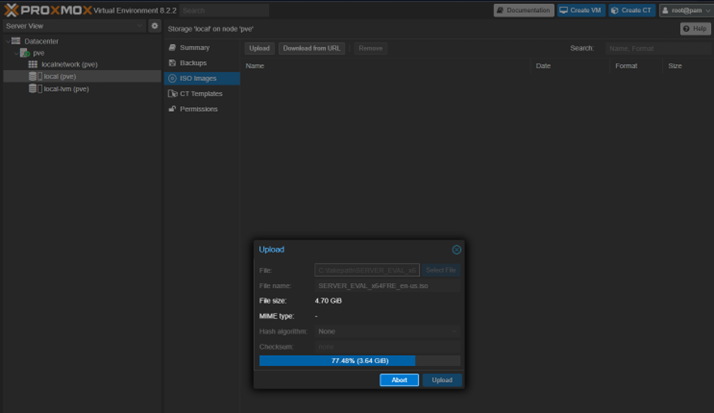 Figure 1: Uploading an ISO file to local Proxmox storage.
2. Create the Virtual Machine (VM)
The following settings reflect the final configuration I used after troubleshooting initial startup errors. These settings are based on the Windows 2022 guest best practices - Proxmox VE guide and were adapted for my specific hardware.
In the Proxmox UI, click the Create VM button in the top-right corner to launch the setup wizard.
- General Tab:
- Name: Give the VM a descriptive name (e.g.,
MS-Server22). - Click Advanced and check the box for Start at boot, since this server will provide critical network services.
- Name: Give the VM a descriptive name (e.g.,
- OS Tab:
- Type: Select
Microsoft Windows. - Version: Choose
11/2022/2025. - ISO Image: Select the Windows Server 2022 ISO you uploaded.
- Mount a second CD/DVD drive and select the
virtio-win-XX.isofor the VirtIO drivers.
- Type: Select
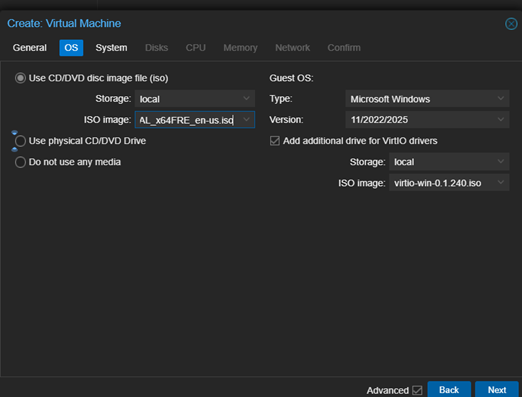 Figure 2: Selecting the Windows Server and VirtIO ISOs.
- System Tab:
- SCSI Controller: Choose
VirtIO SCSI. - Ensure Add TPM is checked.
- SCSI Controller: Choose
 Figure 3: System tab settings with VirtIO SCSI controller.
- Disks Tab:
- Adjust the Disk size as needed.
- Set Cache to
Write backfor better I/O performance.
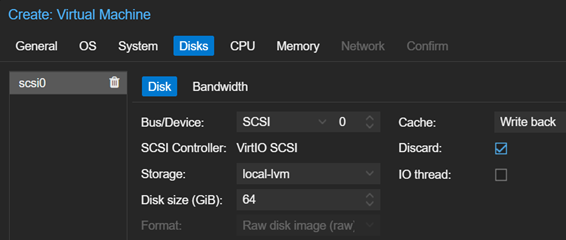 Figure 4: Disks tab settings with Write back cache enabled.
- CPU Tab:
- Set Type to
host. (Note: I initially chosex86-64-v2-V2_AES, which caused startup errors as my hardware didn’t support it).
Research the pros and cons of using a cpu preset vs the
hostoption, then select the appropriate Sockets and Cores for your needs and hardware. - Set Type to
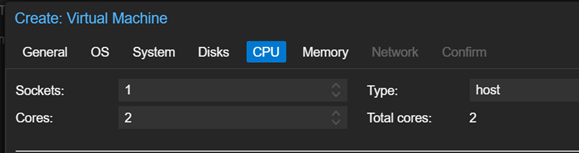 Figure 5: CPU tab with Type set to ‘host’.
- Memory Tab:
- Allocate sufficient RAM.
- Ensure Ballooning Device is enabled, setting a minimum value (e.g., 512 MiB).
Note: Microsoft advises a minimum of 2 GB for Server with Desktop Experience, while 4 GB is recommended.
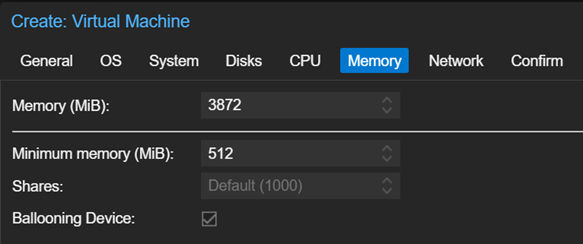 Figure 6: Memory allocation with Ballooning enabled.
- Network Tab:
- Use the
VirtIO (paravirtualized)model for the network device for best performance.
- Use the
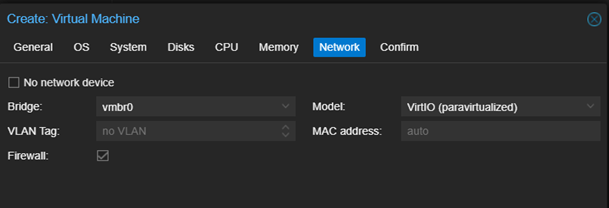 Figure 7: Network tab with VirtIO model selected.
- Confirm Tab: Review your selections on the confirm tab and click Finish.
3. Install Microsoft Server 2022
- Start the VM: In the Proxmox UI left pane, right-click the newly created VM and select Start.
- Open the Console: Select the VM, then click the >_ Console button in the top menu to open the virtual display.
- Load VirtIO Drivers:
- Proceed through the Windows Server installation prompts until you reach the “Where do you want to install the operating system?” screen. You will see a warning that no drives were found. This is expected.
- Click the Load driver link at the bottom of the screen.
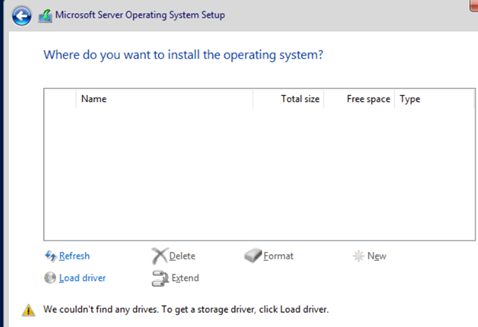 Figure 8: The Windows Server installer cannot find any drives initially.
- In the “Load Driver” window that opens, click Browse and navigate to the VirtIO CD drive.
- SCSI Driver: Navigate to the folder
vioscsi\2k22\amd64, select the “Red Hat VirtIO SCSI pass-through controller,” and click Next to install it. The drive should now appear.
 Figure 9: Browse for the VirtIO drivers during installation.
- Network Driver: After the SCSI driver installs, you will be returned to the “Where do you want to install the operating system?” screen. Again click Load driver process, this time selecting the
NetKVM\2k22\amd64folder to install the “Redhat VirtIO Ethernet Adapter.” - Balloon Driver: Repeat the Load driver process one last time to install the “VirtIO Balloon Driver” from the
Balloon\2k22\amd64folder. - Complete the Installation:
- With the drivers loaded, continue the Windows Server installation. The VM will restart several times.
- After the final restart, to send a Ctrl+Alt+Delete command to the console to log in, you may need to use the Proxmox console’s built-in function.
- To access this click the tab next to the VM console screen in the Proxmox UI then click the A inside a screen icon button. In the fly-out pane click the bottom button with the three squares icon. You can now log in using the password you set up during the installation.
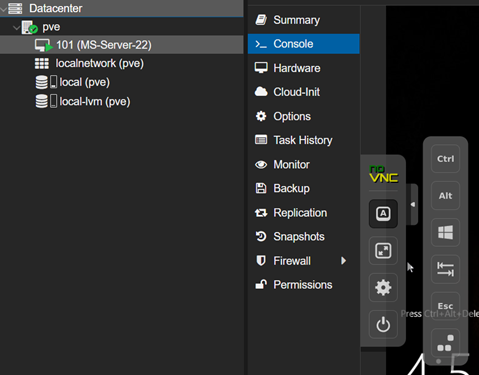 Figure 10: Proxmox UI console login helper interface.
- Once logged in, you will be greeted by the Server Manager Dashboard.
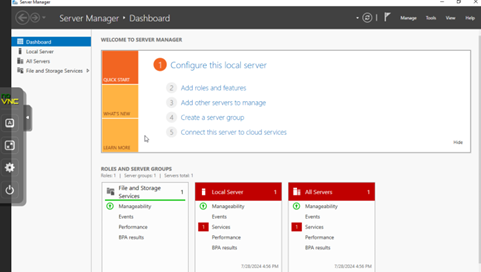 Figure 11: The Server Manager Dashboard upon first login.
4. Post-Installation Steps
- Install Remaining Drivers:
- On the running VM, open File Explorer, navigate to the VirtIO CD drive, and run the
virtio-win-gt-x64Windows Installer file to install any remaining drivers.
- On the running VM, open File Explorer, navigate to the VirtIO CD drive, and run the
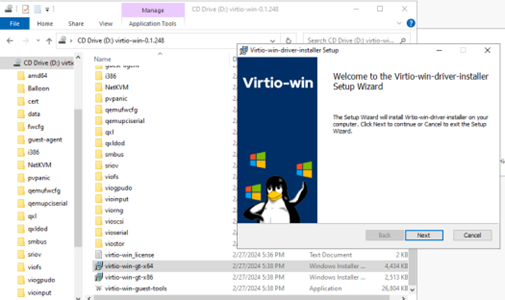 Figure 12: VirtIO guest tools installer.
- Set Static IP Address:
- Configure a static IP address for the server inside Windows. Navigate to Network Connections, open the adapter’s Properties, select Internet Protocol Version 4, and enter the correct IP, subnet, and gateway information according to your network plan.
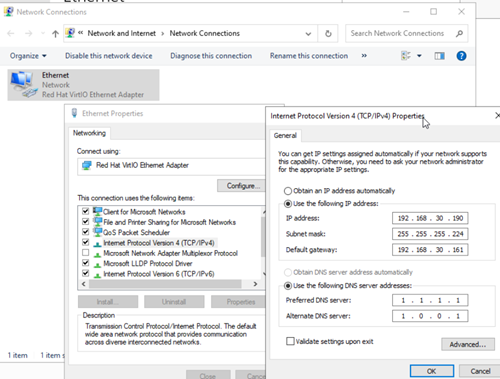 Figure 13: Windows IP configuration screen.
- Install QEMU Guest Agent:
- The QEMU guest agent allows Proxmox to properly interact with the VM. To confirm if it’s running, check the “Summary” tab for the VM in the Proxmox UI; if the IP address isn’t showing, the agent is likely not running.
- To install it, browse the VirtIO ISO again on the server, navigate to the
guest-agentfolder, and run theqemu-ga-x86_64installer. - Confirm successful installation by checking the VM’s “Summary” tab again in Proxmox; the IP information should now be displayed.
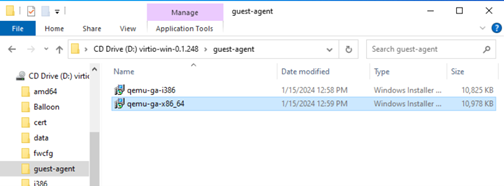 Figure 14: QEMU guest agent installer.
Troubleshooting
1. Proxmox GUI Inaccessible from Main PC
- Symptom: Could not access the Proxmox web UI from my main PC, but could from other devices on the same and different VLANs.
- Diagnostics: Ruled out browser issues by testing multiple browsers and private windows.
pingandtracertshowed network path issues that stopped at my PC. - Solution: Temporarily disabling Windows Defender Firewall allowed access, confirming it was a firewall issue. The permanent solution was to create a new outbound rule in Windows Defender Firewall to allow traffic on TCP port 8006.
- Open Windows Defender Firewall.
- Click Outbound Rules > New Rule....
- Select Port, then TCP, and specify port
8006. - Select Allow the Connection.
- Apply the rule to all profiles (Domain, Private, Public).
- Name the rule (e.g.,
Proxmox UI Outbound) and click Finish.
2. VM Fails to Start After Creation (QEMU exited with code 1)
- Symptom: After creating the VM and clicking “Start”, the task failed with the error:
TASK ERROR: start failed: QEMU exited with code 1. - Diagnostics: I researched Proxmox forums and documentation and decided to first update to the latest VirtIO drivers. When that didn’t resolve it, I focused on the VM hardware configuration. Using the
lscpucommand in the Proxmox host terminal, I determined my laptop’s CPU did not support thex86-64-v2-V2_AESCPU type I had initially selected. - Solution: I re-created the VM with the corrected settings outlined in the “Create the Virtual Machine (VM)” section above. The key changes that resolved the error were:
- System Tab: Changed SCSI Controller to
VirtIO SCSI. - Disks Tab: Changed Cache to
Write back. - CPU Tab: Changed Type to
host. - Memory Tab: Ensured Ballooning Device was enabled with a minimum value set.
- System Tab: Changed SCSI Controller to
Key Learnings & Takeaways
The process of installing and configuring Microsoft Server 2022 on Proxmox was a detailed and highly educational experience. Overcoming challenges such as VM startup errors, driver installations, and client-side firewall issues provided a deep, practical understanding of virtual machine management and systematic troubleshooting. The steps outlined in this guide reflect both standard procedures and the real-world adjustments required for specific hardware and network environments. These experiences are invaluable, enhancing not only my technical skills but also my preparedness for tackling similar challenges in future virtualized environments.