Active Directory Configuration on Windows Server 2022
Context: This guide documents my end-to-end process for setting up Active Directory Domain Services (AD DS), DNS, Organizational Units, Group Policies, and file permissions in a home lab—complete with challenges faced and solutions implemented.
Introduction
After installing Microsoft Server 2022 and configuring its network settings, I proceeded to set up Active Directory (AD) to manage user accounts, groups, and resources. This involved:
- Installing and configuring AD DS and DNS.
- Creating Organizational Units (OUs) and user accounts.
- Designing and applying Group Policies (GPOs).
- Securing file and folder permissions.
Throughout, I documented troubleshooting steps to showcase my problem-solving approach.
Initial Steps & Planning
Before installing Active Directory Domain Services (AD DS), it’s essential to ensure that your DNS configuration is correctly set up. Computers joining the domain must be able to locate your Windows Server acting as the domain controller. This can be achieved by setting your server as the primary DNS for your network or by configuring DNS forwarding on your primary DNS server specifically for the Active Directory domain.
I also considered the impact of these changes on my devices and overall network when my server trial period ends. I researched and created the plan outlined below before beginning.
Ensuring Smooth Transition After Server Trial Ends
Tip: If using the server trial version for learning purposes only, plan ahead for role reversal when the trial expires.
- Plan for Role Reversal:
- Identify server roles (DNS, DHCP, AD DS), document current settings, and plan to revert these functions to their original configuration (e.g., on the router) once the trial ends.
- DNS and DHCP: Ensure the router or another device can take over these roles. Document the current DNS and DHCP settings on the TP-Link ER605 router.
- File Shares: Plan to transfer any critical data off the server before it expires.
- Deactivate Server Roles Gradually:
- Reduce dependency on the server before the trial period concludes.
- Backup AD DS Data: Back up important data. Properly demote the server using Server Manager or PowerShell cmdlets before shutting it down. See Microsoft Windows Server Documentation for detailed instructions.
- DNS Records: Update or remove DNS records on the server as needed.
- Switch Back to Router DHCP/DNS:
- Ensure the TP-Link ER605 router is configured to resume DHCP and DNS roles for the network.
- Client Reconfiguration:
- Change network adapter settings on client devices to obtain DNS settings automatically (from the router).
- Router Configuration Adjustment:
- Change VLAN and DNS server settings on the router from manual (pointing to the Windows Server) back to automatic or its previous state.
Configuration Steps
1. Assign the Server a Name
After logging into the Server VM, the Server Manager window will display by default. The first step is to assign a name to the server, as changing it later after AD DS installation can be complex.
- In Server Manager, click Local Server in the left pane.
- In the Properties section, click the existing computer name link.
- In the System Properties pop-up, click Change....
- Enter a descriptive server name (e.g.,
DC01).
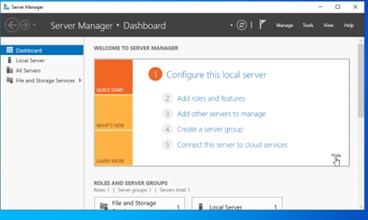 Figure 1: System Properties dialog for changing the computer name.
- Click OK to apply the changes, then restart the server to update the settings.
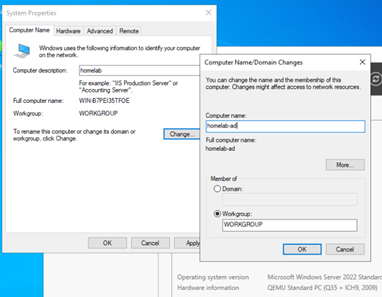 Figure 2: Prompt to restart the server.
2. Installing AD DS and DNS Roles
Once the server has restarted and you are logged in again:
- In Server Manager, click Manage → Add Roles and Features. This will start the Add Roles and Features Wizard.
- Click Next to begin.
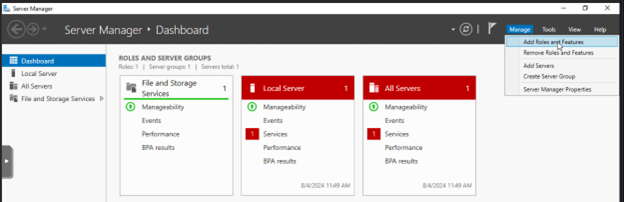 Figure 3: The “Before You Begin” screen of the Add Roles and Features Wizard.
- Installation Type: Keep the default “Role-based or feature-based installation” radio button checked → Next.
- Server Selection: Keep the default “Select a server from the server pool” checked
- ensure your server is highlighted, → Next.
- Server Roles: Select the following roles:
- Active Directory Domain Services → click Add Features.
- DNS Server → click Add Features.
- Features: Leave the default features selected → Next.
- AD DS / DNS Server: Click through the informational pages for AD DS and DNS Server.
- Confirmation: Review your selections. If changes are needed, use the Previous button.
- Check the box “Restart the destination server automatically if required”.
- Click Install → close the wizard after completion.
3. Promote the Server to a Domain Controller
After installing the roles → promote the server to a domain controller.
- In Server Manager, click the flag icon in the top right
- click the blue link: “Promote this server to a domain controller”.
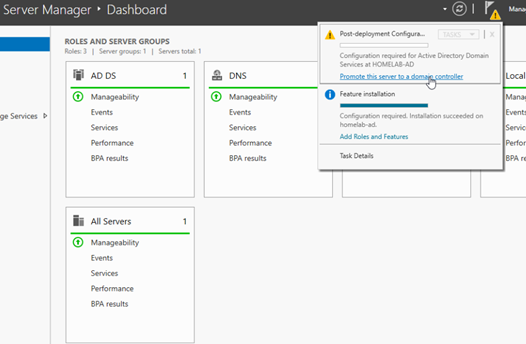 Figure 4: Notification to promote the server.
4. Creating a New Forest and Domain
This will launch the Active Directory Domain Services Configuration Wizard.
- Deployment Configuration:
- Options include:
- Add this domain controller to an existing domain: Used for adding more DCs to an existing domain for redundancy/load balancing.
- Add a new domain to an existing forest: Used for larger organizations with multiple domains in a hierarchy.
- Add a new forest: Creates the first domain in a new AD forest.
- Choose “Add a new forest”
- Root domain name: Enter a meaningful root domain, I chose
homelab.lan.For a home lab, using a non-publicly routable top-level domain like
.lanor.localis common. In a production environment, you would typically use a subdomain of your registered public domain name (e.g.,ad.yourcompany.com).
- Options include:
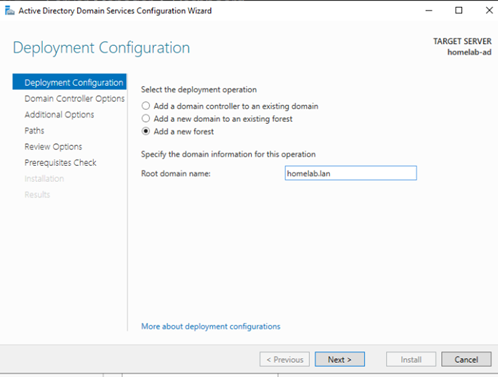 Figure 5: Naming the new forest and root domain.
- Domain Controller Options:
- Leave the default Forest and Domain functional levels.
- Ensure Domain Name System (DNS) server and Global Catalog (GC) are checked.
Enter a strong Directory Services Restore Mode (DSRM) password → Next
Warning: This password is critical for AD recovery scenarios. Store it in a safe place.
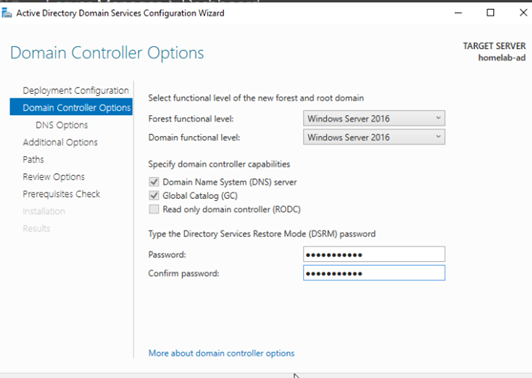 Figure 6: Setting Domain Controller options and DSRM password.
- DNS Options:
- A warning regarding DNS delegation may appear. You can safely ignore this in a home lab environment by clicking Next.
Tip: In production enviornment, a dedicated DNS server and DNS delegation would be used.
- A warning regarding DNS delegation may appear. You can safely ignore this in a home lab environment by clicking Next.
- Additional Options:
- Leave the NetBIOS domain name as the default suggested by the wizard (e.g.,
HOMELAB) → Next.
- Leave the NetBIOS domain name as the default suggested by the wizard (e.g.,
- Paths:
- Leave the default folder paths for the AD DS database, log files, and SYSVOL. → Next.
- Prerequisites Check: The system will perform a prerequisites check. Warnings are normal in a home lab setup. Click Install to begin the promotion.
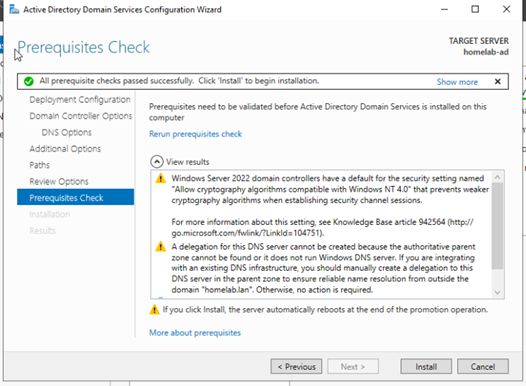 Figure 7: Prerequisites check before installation.
- The server will restart automatically after the installation and promotion are complete.
5. Setting up DNS Forwarding (DNS Proxy)
To allow clients in your domain to resolve both internal AD resources (like homelab.lan) and external internet addresses, DNS needs to be configured correctly.
- Option A: Windows Server as Primary DNS for all clients: You can configure your DHCP server (likely your router) to assign the Windows Server’s IP address as the primary DNS server to all clients. In this case, you’d configure “Forwarders” in the DNS Server role on Windows Server to point to external DNS servers (like your ISP’s DNS or public ones like
9.9.9.9).If the Windows Server (acting as the sole DNS) goes offline or is undergoing updates, clients may lose internet connectivity. This setup is common in businesses for internal resolution but often involves multiple resilient DNS servers.
- Option B: DNS Forwarding on the Router (My Choice): To avoid potential internet connectivity issues if my single Windows Server VM was offline, I configured DNS forwarding (sometimes called conditional forwarding or DNS proxy) on my TP-Link router.
- The settings were found under Wired Networks → LAN → (Edit icon for each VLAN).
- For DNS Server, I chose the manual setting:
- Primary DNS: Server IP (e.g.,
192.168.30.190- Note: Ensure you use the Windows Server’s IP, not the Proxmox host’s IP.) - Secondary DNS: An external DNS server (e.g., Quad9 -
9.9.9.9) for fallback.
- Primary DNS: Server IP (e.g.,
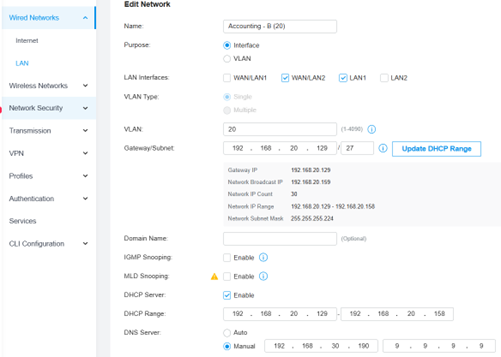 Figure 8: DNS forward settings in Tp-Link Router.
Next, I verified DNS functionality using
nslookup homelab.lanon a client device.On client PCs, the network adapter settings were configured to use these DNS servers (or receive them via DHCP if the router was set to distribute them for that VLAN).
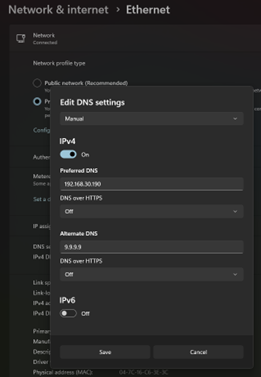 Figure 9: Example of client network adapter DNS settings in Windows 11 OS.
- On clients, I used
ipconfig /flushdnsandipconfig /registerdnsto quickly apply the new settings via the command line.
6. Verifying and Configuring DNS Settings on the Server
My initial setup in step 5 did not immediately result in proper DNS resolution.
- Forward Lookup Zone: In DNS Manager on the server (accessible from Server Manager > Tools), I confirmed that the
homelab.lanforward lookup zone existed and its properties were correct.Tip: Reverse lookup zone must be configured on server for proper DNS functionality in the home lab configuration.
- Reverse Lookup Zone: I noticed there was no entry in Reverse Lookup Zones. This zone is crucial for mapping IP addresses back to hostnames, essential for some network services and troubleshooting.
- To create it:
- Open DNS Manager.
- Expand the server node, right-click on Reverse Lookup Zones → New Zone....
- Follow the wizard: select “Primary Zone”, choose the storage option (Active Directory-integrated), select “IPv4 Reverse Lookup Zone”, enter the Network ID part of your server’s subnet (e.g.,
192.168.30), and enable secure dynamic updates.
- To create it:
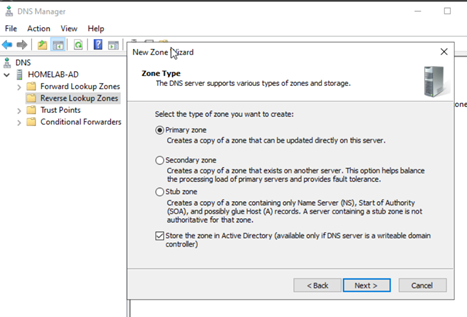 Figure 10: Specifying Network ID for Reverse Lookup Zone.
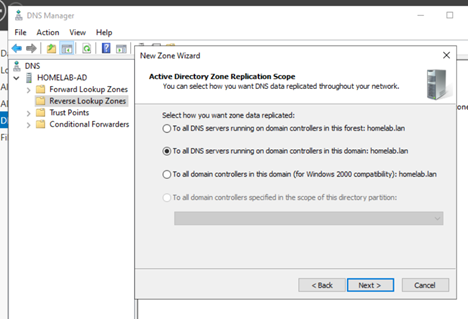 Figure 11: Auto-generated zone name for Reverse Lookup Zone.
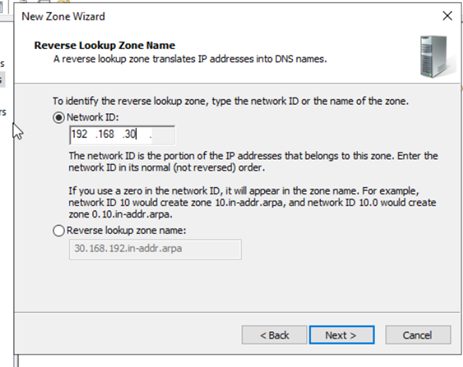 Figure 12: Setting Dynamic Update option.
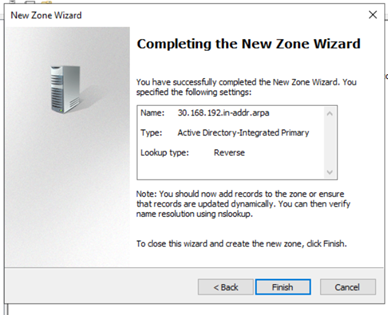 Figure 13: Completing the New Zone Wizard.
- DNS Forwarders: In DNS Manager, right-click the server name, select Properties, and go to the Forwarders tab.
- I added public DNS server IPs (e.g.,
9.9.9.9and1.1.1.1) here.
- I added public DNS server IPs (e.g.,
- Client DNS Correction: I re-checked client devices and the TP-Link router settings to ensure the primary DNS was correctly pointing to the Windows Server’s IP (
192.168.30.190), not the Proxmox host IP. - Testing:
- On the server, ran
ipconfig /registerdnsto ensure the DC itself was correctly registered. - Used
nslookup homelab.lanon clients.- If
nslookupfailed, I rannslookup homelab.lan 192.168.30.190(specifying the server) to determine if the DNS server itself could resolve the name.
- If
- On clients, ran
ipconfig /flushdnsthenipconfig /registerdnsto clear out cache and force DNS re-query and re-registrations.
- On the server, ran
- These sequential steps resolved the DNS issues.
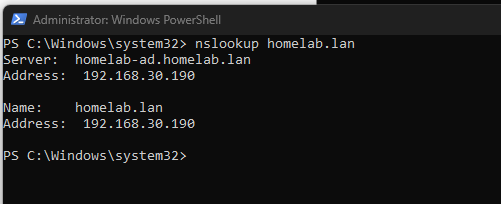 Figure 14: Successful nslookup indicating DNS is working.
7. Planning and Creating Organizational Units (OUs)
Next, with my OU network design plan structured to manage users, groups, and policies across my simulated departments, I began implementing a hierarchical Active Directory structure. My core strategy for this design, reflecting common industry best practices, focused on achieving a balance between broad security enforcement and granular administrative control. This involved:
- Establishing a domain-level Group Policy Object (GPO) to apply baseline security policies uniformly across all users and computers, ensuring a foundational security posture for the entire network.
- Creating specific Organizational Units (OUs) for different administrative roles (e.g., Server Admins, Department Admins, Tech Support Admins).
- Implementing OU-level GPOs and carefully configured inheritance rules to grant tailored permissions and reverse general restrictions for these designated administrative groups, strictly adhering to the principle of least privilege.
- Strategically blocking inheritance on sensitive OUs, such as those containing server administrator accounts, to protect them from unintended or overly restrictive domain-wide policies.
Have an Organizational Unit Design in place that meet your immediate and future network needs before creating policies and adding users and devices.
- To begin creating the design, open Active Directory Users and Computers (ADUC) from Server Manager → Tools, or by searching for
dsa.msc. - Create Top-Level OU: Right-click on the domain (e.g.,
homelab.lan), select New > Organizational Unit. Name it (e.g.,Departments).
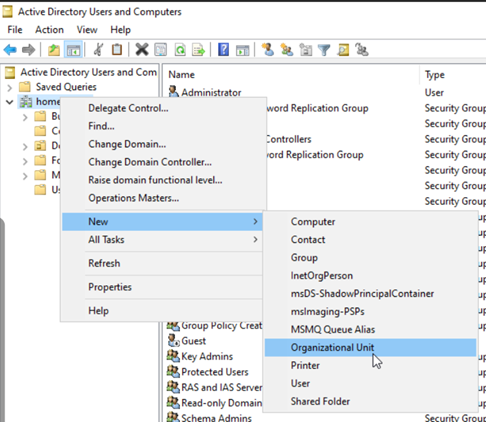 Figure 15: New Object - Organizational Unit dialog box.
- Create Sub-OUs: Right-click on the newly created
DepartmentsOU and repeat the process to create Sub-OUs for each department (e.g.,Operations,Accounting,Marketing,TechSupport,Management).
 Figure 16: Example OU structure within ADUC.
8. Creating New User Accounts
- In ADUC, navigate to the appropriate department OU.
- Right-click the OU, select New → User.
- Fill in the user details (First name, Last name, User logon name). Use a consistent naming convention.
- Set a password and configure password options (e.g., “User must change password at next logon”).
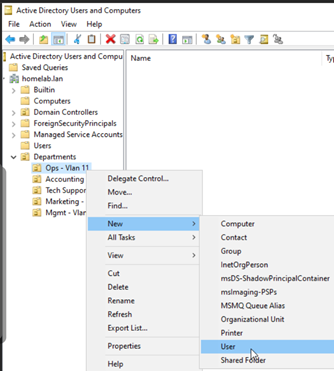 Figure 17: New Object - User dialog, first screen.
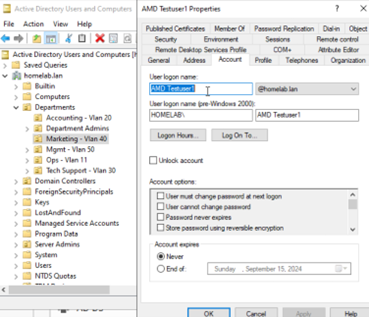 Figure 18: New Object - User dialog, password options.
- Repeat for all users, placing them in their correct department OUs.
9. Joining Client Computers to the Domain
For a Windows 11 Pro client:
- Log into an existing local administrator account on the client PC.
- Open Settings → Accounts → Access work or school.
- Click Connect.
- At the bottom of the Microsoft account prompt, click the link “Join this device to a local Active Directory domain”.
- Enter your domain name (e.g.,
homelab.lan) → Next. - Enter the credentials of a domain user account that has permissions to join computers to the domain (e.g., a domain admin account or a user you’ve delegated this right to). Follow the prompts.
- Restart the client PC when prompted. You can now log in with domain user credentials.
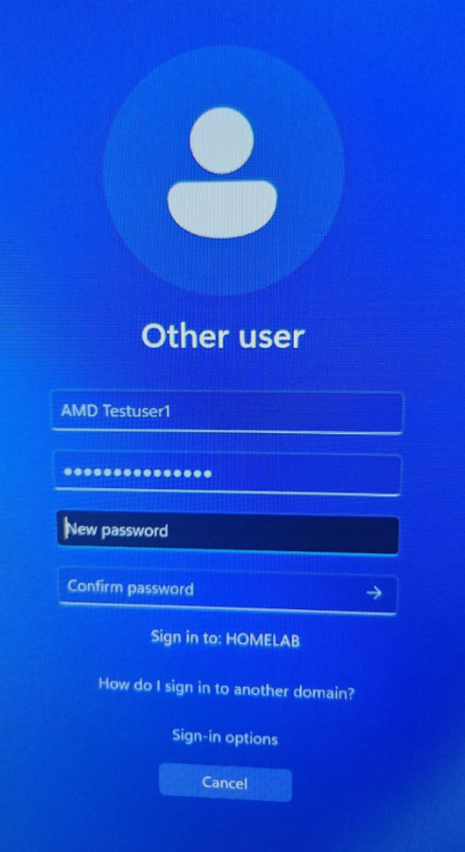 Figure 19: Windows 11 “Set up a work or school account” dialog.
Tip: If you encounter issues joining or logging in, ensure the client PC’s network adapter is configured to use the AD DNS server (your Windows Server). If problems persist, try joining using domain admin credentials first, then attempt user login.
10. Implementing GPO Policies and Inheritance Structure Design
Understanding Group Policy inheritance (LSDOU: Local, Site, Domain, OU) is crucial.
- Design Strategy Review:
- Create a top-level OU (e.g.,
AdminAccounts) for all administrator accounts to isolate them. - Create a
DepartmentAdminsOU and a nestedTechSupportAdminsOU within it for tiered admin rights. - Apply broad security GPOs at the domain level (e.g.,
Domain Computer Security Policies). - Block inheritance on the
AdminAccountsOU to protect server admins. - Create specific GPOs at the
DepartmentAdminsandTechSupportAdminsOU levels to grant necessary permissions (least privilege principle) by reversing/overriding certain domain-level restrictions.
- Create a top-level OU (e.g.,
- Creating Admin OUs:
- In ADUC, right-click the domain, select New → Organizational Unit to create
AdminAccounts. Move existing admin users into it. Repeat forDepartmentAdmins(underDepartmentsOU or at domain level) andTechSupportAdmins(underDepartmentAdmins).
- In ADUC, right-click the domain, select New → Organizational Unit to create
- Creating Admin Security Groups:
- In ADUC, right-click the
DepartmentAdminsOU, select New → Group. - Name:
DeptAdmins_Grp, Scope:Global, Type:Security. - Add relevant user accounts to the “Members” tab.
- On the “Member Of” tab, add this group to built-in groups like
Administratorsfor basic admin rights. ForTechSupportAdmins_Grp, I also added them to theDomain Adminsgroup for higher privileges.
- In ADUC, right-click the
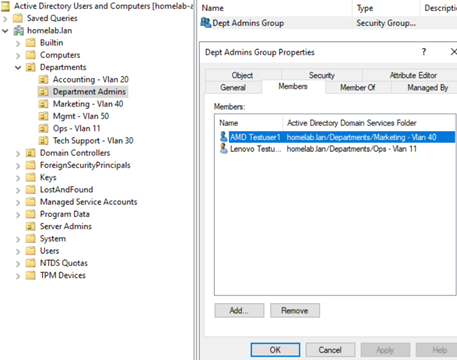 Figure 20: Making the custom ‘Dept Admins Group’ a member of the built-in ‘Administrators’ group.
Real-World Scenario: Employee Promotions In a production environment, when a user is promoted to an administrative role, the standard procedure is to both move their user object to the appropriate administrative OU and add them as a member to the relevant administrative security groups. The move ensures they receive the correct policies, and the group membership grants them the necessary permissions.
11. Blocking GPO Inheritance
- Open Group Policy Management (from Server Manager → Tools, or
gpmc.msc). - Right-click on the
AdminAccountsOU and select “Block Inheritance”. This prevents GPOs from higher levels (like the domain) from applying to this OU.
12. Using Group Policy to Manage & Secure User Accounts
- Create Domain-Level GPO: In Group Policy Management, right-click your domain (e.g.,
homelab.lan), and select “Create a GPO in this domain, and Link it here...”. Name it (e.g.,Domain Computer Security Policies).
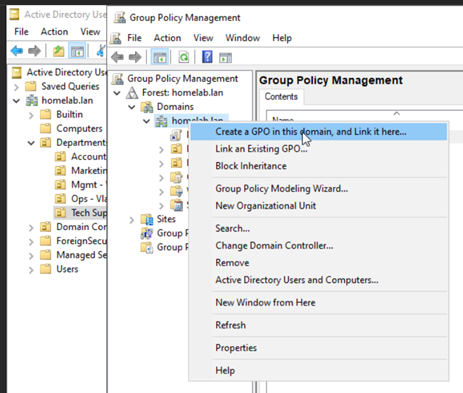 Figure 21: Creating and linking a new GPO.
- Edit GPO: Right-click the new GPO and select Edit.... Navigate Computer Configuration or User Configuration to set policies.
- Example Policy (Test): To test GPO application, I prohibited access to the Control Panel for all users:
- Path:
User Configuration>Policies>Administrative Templates>Control Panel>Prohibit access to Control Panel and PC settings. Set to Enabled.
- Path:
- Create OU-Level GPO to Override: Create another GPO linked to the
DepartmentAdminsOU. Edit it and set the same “Prohibit access to Control Panel…” policy to Disabled. This should reverse the domain policy for users in this OU and its children (likeTechSupportAdmins).
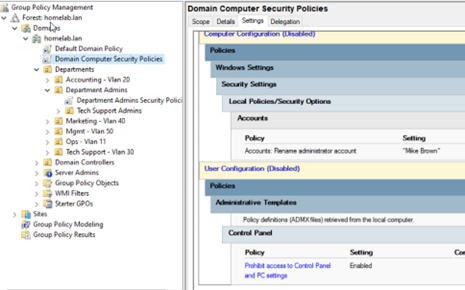 Figure 22: Enabling the “Prohibit access to Control Panel and PC settings” policy.
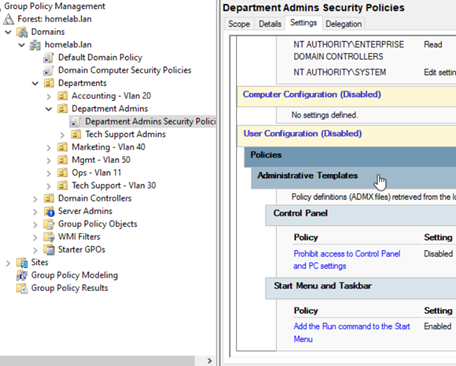 Figure 23: Illustrating GPO linking and (intended) inheritance.
13. Testing GPO Policies
- Server Admin User: Logged in as a server admin (in the
AdminAccountsOU with Block Inheritance). Verified Control Panel access was not blocked. Success. - Non-Admin User: Logged in as a regular user. Trying to access Control Panel resulted in a restriction message. Success (domain GPO applied).
Note: If testing with a user already logged in, run
gpupdate /forcein their command prompt or sign them out and back in to ensure policies apply. - Department Admin User: Logged in as a department admin. Control Panel access was still blocked. This was unexpected, as the OU-level GPO should have overridden the domain GPO.
Troubleshooting & Key Learnings
1. GPO Application Failure: The Resolution
Observed Problem: The GPO designed to grant Control Panel access to administrators was not applying. Despite being in the correct security group, administrative users were still blocked by the domain-wide restrictive policy.
Diagnostic Process: I systematically verified the exact location of the administrative user objects (e.g.,
Lenovo Testuser1) within the ADUC hierarchy. By enabling “Advanced Features” in the View menu of ADUC, I could inspect thedistinguishedNameattribute in each user’s properties for definitive proof of their OU path.Key Finding: The critical discovery was that while the security group (
Dept Admins Group) was correctly placed in the OU where the “Allow” GPO was linked (homelab.lan/Admin Accounts/Department Admins), the user objects themselves were still located in their original departmental OUs (e.g.,homelab.lan/Departments/Marketing - Vlan 40).Core Principle Learned (Crucial for AD Design): This highlighted a fundamental principle of Group Policy: GPOs apply primarily based on the Organizational Unit (OU) location of the User or Computer object, not solely on group membership. Security groups are primarily for granting access permissions to resources (like files and folders), whereas OUs are for policy application and administrative delegation.
Action Taken: I performed a planned move of the administrative user objects from their departmental OUs to the appropriate administrative OUs using the drag-and-drop or “Move” function in ADUC.
Verification: On the client device, after the user objects were moved, I forced a Group Policy update (
gpupdate /forcein an elevated Command Prompt), followed by a sign-out and sign-in of the administrative user.Result: SUCCESS! The administrative users were now able to access the Control Panel. Correctly placing the user objects within the GPO-linked OU was the solution. The
gpresult /rcommand confirmed that both the restrictive domain policy and the overriding administrative policy were being applied correctly.
2. Other Lessons Learned During the Project
- VM Console Interaction (SPICE vs. VNC):
- Problem: Difficulty with host-to-VM copy/paste despite the QEMU Guest Agent being installed.
- Diagnosis: Realized that while the Proxmox VM’s virtual hardware was configured for SPICE, the web-based console was still using VNC.
- Lesson Learned: VM hardware configuration and the host’s connection method (console client) must align for full feature utilization. To use SPICE’s advanced features like seamless copy/paste, a dedicated SPICE client (like
virt-viewer) is required on the host machine.
- Active Directory User Object Property Best Practices:
- Challenge: When moving administrative users to dedicated OUs, I needed a way to track their original departmental affiliation for organizational clarity.
- Solution: Utilized standard user object properties in ADUC, such as the
Description,Department, andOfficefields, to record a user’s original role or department. - Lesson Learned: The importance of robust documentation and attribute management within Active Directory for maintaining user context and aiding auditing in complex organizational structures.