Backing Up an Active Directory VM for Migration
📚 Part 1 of the Series: Building a Scalable Home Lab
Context: This guide documents the critical process of performing a full backup of an existing Windows Server 2022 Active Directory Domain Controller (AD DC). This is a crucial first step for any VM migration, emphasizing data integrity, recovery planning, and pre-migration diligence.
Introduction: The Importance of Domain Controller Backups
The Domain Controller (DC) is the heart of a Windows network, acting as the central authentication and identity source. It stores all user and computer accounts, security policies, and other essential Active Directory objects. The loss of a DC can be catastrophic, preventing users from logging in and potentially causing a complete network outage.
System State and FSMO Roles
Unlike a simple file backup, a DC backup must capture the system state, which includes the Active Directory database (NTDS.dit), SYSVOL folder, registry, and other critical components. This is essential for properly restoring the domain, especially the Flexible Single Master Operation (FSMO) roles that are handled by a single DC.
This comprehensive backup serves as a preparatory safety measure for migrating the existing AD DC VM from its current resource-limited Proxmox host to a more powerful, dedicated one.
Pre-Backup Documentation and Health Check
Before any backup or migration, it’s vital to document the current state of the VM and verify the health of Active Directory.
1. Gathering Network Configuration
Documenting network details beforehand is critical for successful post-migration verification. After logging into the Windows Server VM, the ipconfig /all command was executed in an elevated PowerShell prompt.
1
ipconfig /all
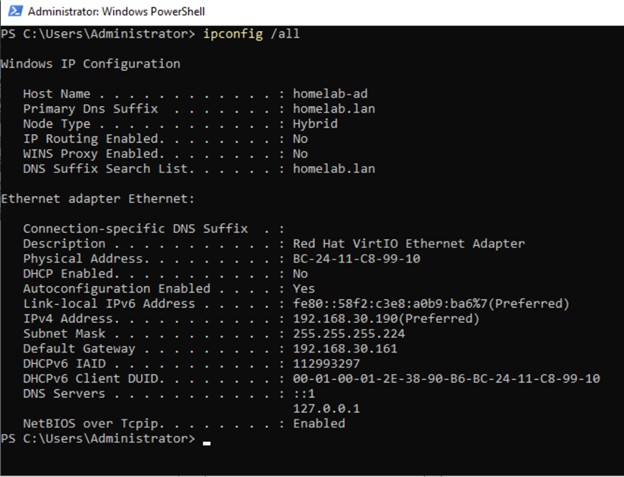 Figure 1: Output of
 ipconfig /all showing critical network configuration for migration.
Recording the IPv4 Address (192.168.30.190), Subnet Mask (255.255.255.224), Default Gateway (192.168.30.161), and DNS Servers (127.0.0.1) establishes a baseline to verify against after the migration is complete.
2. Checking Active Directory Health
Migrating a DC with pre-existing issues can lead to persistent problems. The dcdiag tool is indispensable for performing a series of health checks. First, a check on DNS health was performed using dcdiag /test:dns.
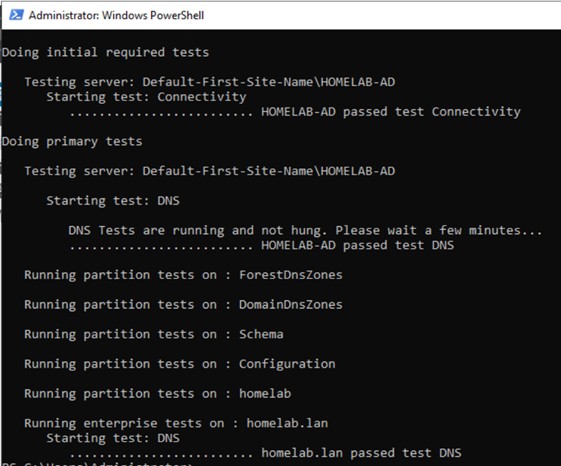 Figure 2: Successful DNS health check results from the
 dcdiag tool.
A successful result, indicated by “passed test DNS,” signified that the DC’s DNS services were functioning correctly. Next, a comprehensive diagnostic test was performed on all DC components with dcdiag /c.
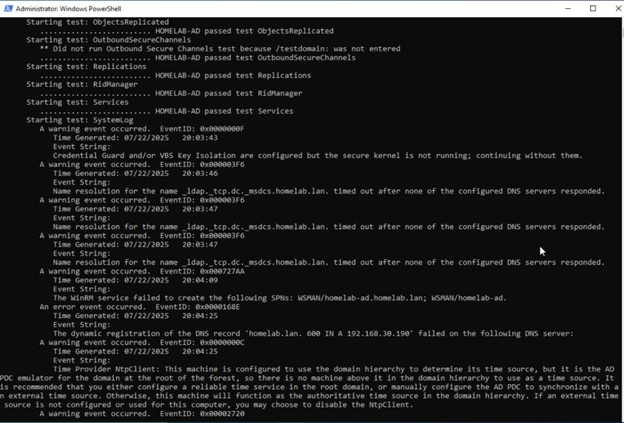 Figure 3: Comprehensive
 dcdiag output highlighting warnings for future resolution.
While many core tests passed, the output revealed a SystemLog failure and several warnings related to DNS name resolution and the NTP Client. For the purpose of this guide, these diagnostics document the current state. The focus remains on securing a reliable backup, with a plan to address these non-critical warnings after the migration.
A Note on Triage in IT
This approach demonstrates a realistic understanding of managing production-like environments, where immediate problem resolution must often be balanced with completing critical, scheduled tasks like a migration.
3. Documenting Current Performance Metrics
To establish a performance baseline, the VM’s resource allocation and the host’s hardware specifications were documented. This allows for a direct comparison after migrating to the new, more powerful Dell Precision 7710 hardware.
- VM Resource Allocation: In the Proxmox UI, the VM’s Hardware tab was reviewed.
- Current Performance: The CPU and memory usage were monitored from the VM’s Summary tab.
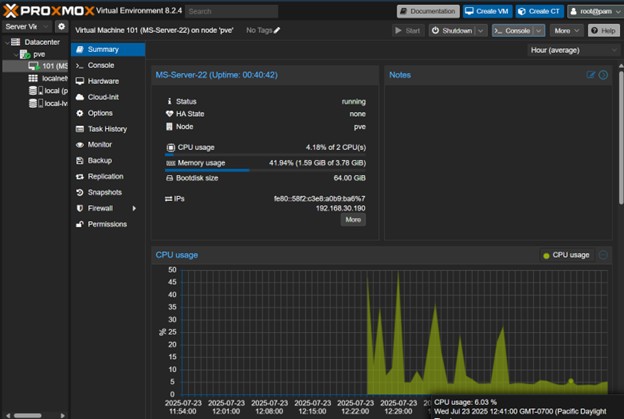 Figure 4: Proxmox UI showing VM hardware allocation and summary metrics.
Host Hardware Specs: Accessed via Datacenter → pve → Shell in the Proxmox UI. The following commands were executed:
1
2
3
4
5
# Get CPU model
cat /proc/cpuinfo | grep "model name" | head -1

# Get total memory
free -h
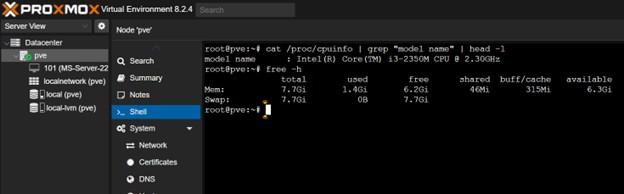 Figure 5: Proxmox shell output showing host hardware specifications.
This documentation provides a clear “before” snapshot for performance benchmarking once the migration is complete.
4. Documenting Network Architecture
To complete the pre-migration snapshot, the current network routing table was captured from the Windows Server VM.
1
route print
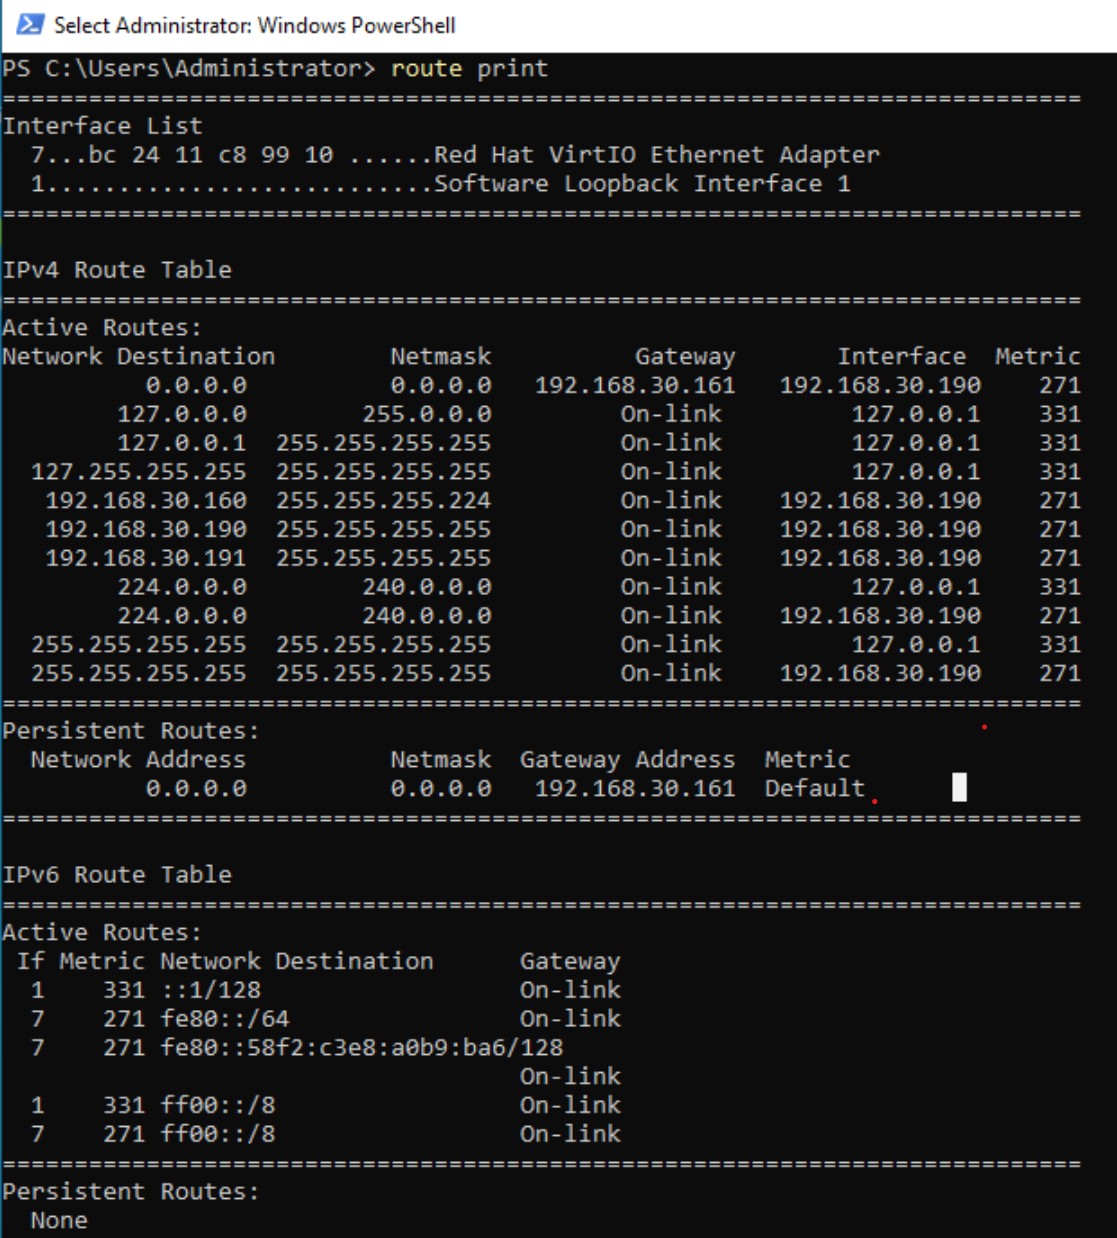 Figure 6: The output of
 route print, documenting the VM’s current network routes.
To complement the routing table, the current network topology was visualized using Packet Tracer. This diagram reflects how the VM interfaces with other lab components, including VLAN segmentation and gateway routing.
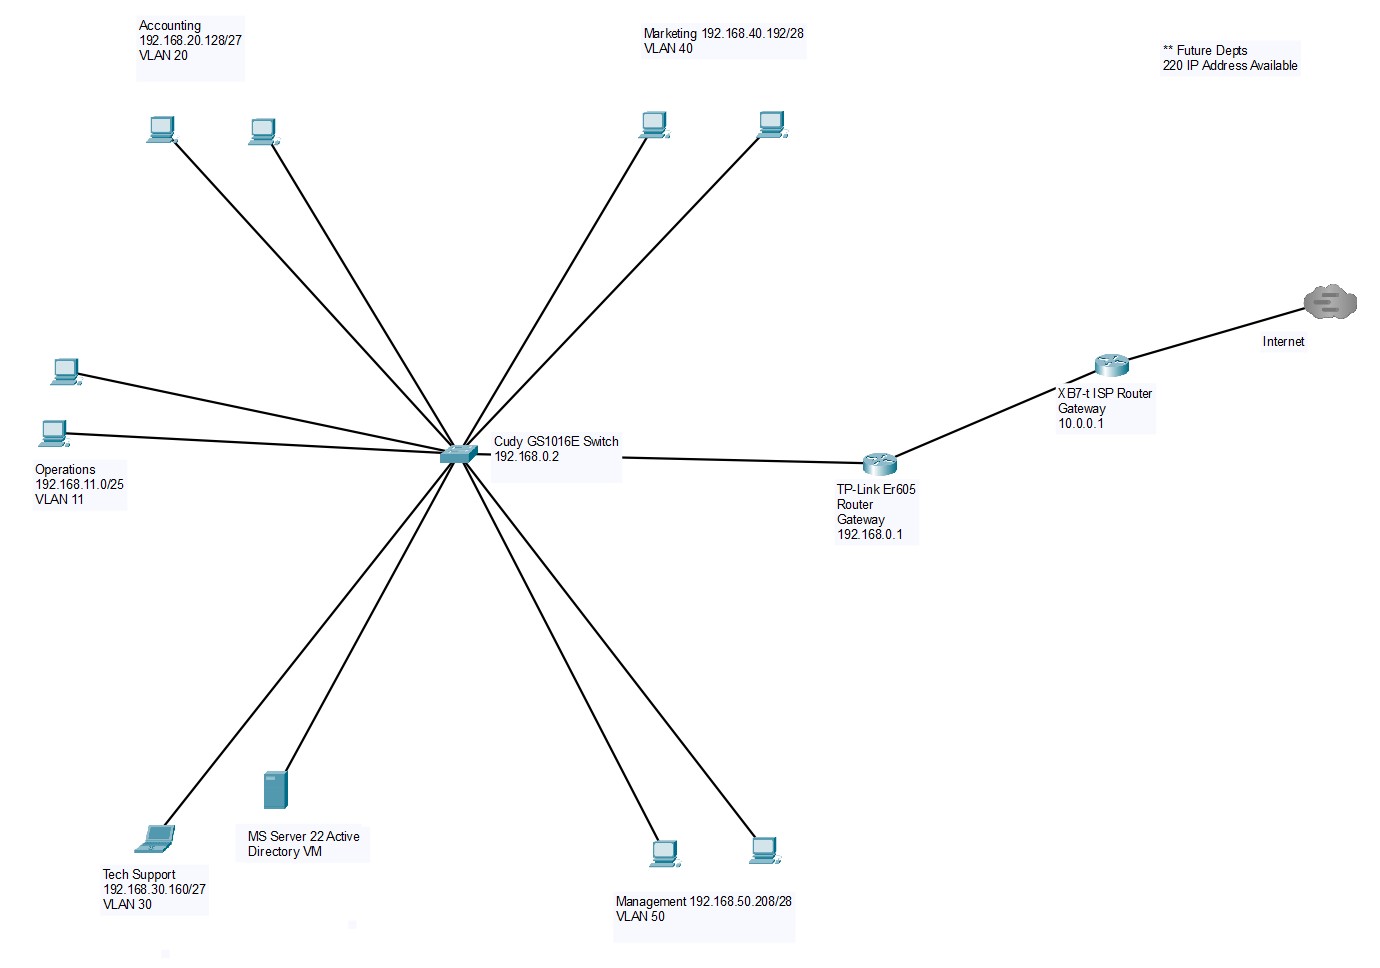 Figure 7: Packet Tracer diagram showing current network topology and routing paths.
Choosing the Backup Method (Proxmox VZDump)
When backing up a VM, especially a DC, there are two main approaches:
- Hypervisor-level backups (e.g., Proxmox
vzdump): Captures the entire VM state, including virtual disks and configuration. - In-guest backups (e.g., Windows Server Backup): Runs inside the OS to back up specific files or the system state.
Tip: Use
vzdumpfor Proxmox MigrationsFor migrating a VM between Proxmox hosts,
vzdumpis the preferred method. It creates a comprehensive, self-contained backup file that can be easily restored to a new Proxmox environment, streamlining the transition.
Migration Risk Assessment and Mitigation
In an enterprise environment, a risk assessment is crucial. To gain hands-on experience with ITSM best practices, a plan was created for this home lab migration.
1. Downtime Planning
The following table estimates the downtime window for the entire migration process.
| Migration Phase | Estimated Duration (HH:MM) | Notes |
|---|---|---|
| Current VM Shutdown & Backup Creation | 00:30 - 01:00 | Graceful shutdown and vzdump backup. |
| Backup Transfer to Main PC | 00:15 - 00:30 | Depends on network speed and file size. |
| New Proxmox Host Installation | 01:00 - 02:00 | OS installation and basic configuration. |
| VM Restoration to New Host | 00:30 - 01:00 | Importing the VM from the backup file. |
| Post-Migration Verification & Config | 00:30 - 01:00 | Testing VM functionality and AD services. |
| TOTAL ESTIMATED DOWNTIME WINDOW | 02:45 - 05:30 | Actual user impact begins at VM shutdown. |
2. Rollback Strategy
A clear rollback strategy was developed. The existing VM on the original host would be kept powered on and functional until the new DC on the new hardware was fully verified. If the migration failed, the new VM would be powered off, and operations would continue on the original host, ensuring no lasting downtime.
Performing the Proxmox VZDump Backup
The following steps were performed to create the backup within the Proxmox environment.
1. Pre-Backup Check: Confirming Sufficient Local Storage
From the Proxmox host shell, it was confirmed that there was sufficient free space for the backup file using df -h.
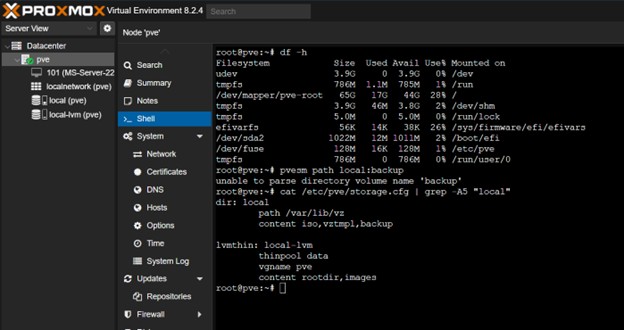 Figure 8: Proxmox shell output showing using
 df -h to confirm available disk space on the Proxmox host.
2. Navigating to the Backup Interface
In the Proxmox UI, the VM (101 (MS-Server-22)) was selected, and the Backup tab was opened.
3. Configuring the Backup Task
The Backup now button was clicked, and the task was configured with these key settings:
- Storage:
local - Mode:
snapshot(Ensures data consistency for a running VM) - Compression:
ZSTD(A good balance of speed and compression ratio)
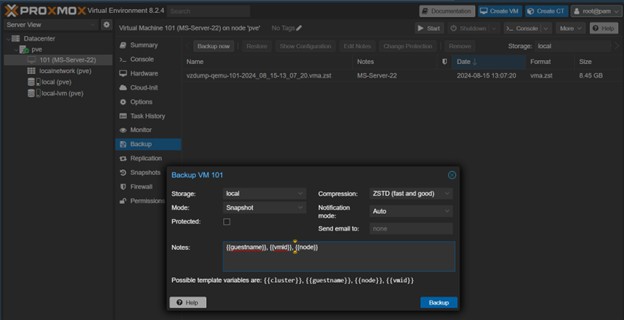 Figure 9: Configuring the
 vzdump backup job in the Proxmox UI.
4. Monitoring and Verifying the Backup
The task was monitored in the UI viewer, and it was confirmed that it completed with an “INFO: Backup finished successfully” message.
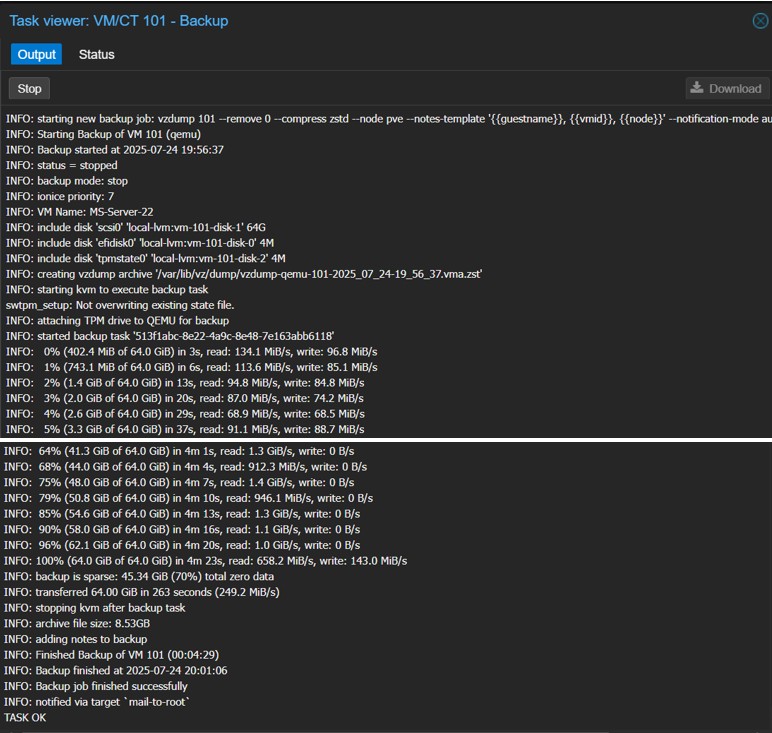 Figure 10: Task viewer showing the successful completion of the backup job (time-lapsed).
The new .vma.zst file was then confirmed to be present in the local storage’s Backups tab and by running ls -lah /var/lib/vz/dump/ in the shell.
Backup Integrity and Verification
Verifying the backup file’s integrity is a non-negotiable step.
1. Generate Checksum for Transfer Verification
In the Proxmox shell, the dump directory was accessed and a SHA256 checksum was generated, saving the output to a text file. This checksum is used to verify the file after transferring it over the network.
1
2
cd /var/lib/vz/dump/
sha256sum vzdump-qemu-101-*.vma.zst > "backup_checksum_$(date +%Y%m%d).txt"
2. Test Compression Integrity
The zstd command was used to test the integrity of the compressed archive itself. An exit code of 0 confirms the file is not corrupted.
1
2
zstd -t vzdump-qemu-101-*.vma.zst
echo "Exit code: $?"
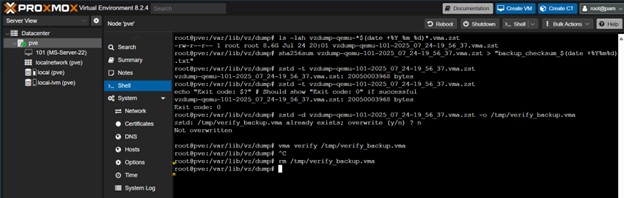 Figure 11: A successful
 zstd integrity test returning an exit code of 0.
Tip: The Value of Verification
The
zstd -tcommand is the most direct way to confirm a backup file is not corrupted. The checksum is critical for verifying the file’s integrity after it has been transferred across the network, allowing for a direct comparison between the source and destination files.
Post-Backup Steps and Next Phase
With a verified backup secured, the final preparatory steps could be completed.
1. Transferring Backup for Secure Storage
Warning: No UI Download Button
The Proxmox web UI does not provide a native “Download” button for VM backups. File transfers must be handled with command-line tools like
scpfor efficiency and reliability.
From a main PC’s PowerShell, scp was used to pull both the backup file and its corresponding checksum file from the Proxmox host.
1
2
3
4
5
6
7
8
# Create a local directory for the backup
New-Item -Path "C:\Proxmox\Backups" -ItemType Directory -Force

# Securely copy the backup file from the Proxmox host
scp root@192.168.30.189:/var/lib/vz/dump/vzdump-qemu-101-*.vma.zst C:\Proxmox\Backups\

# Securely copy the checksum file
scp root@192.168.30.189:/var/lib/vz/dump/backup_checksum_*.txt C:\Proxmox\Backups\
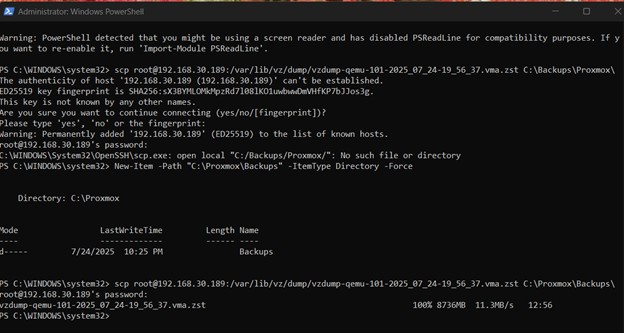 Figure 12: Using SCP in PowerShell to transfer the backup file from the Proxmox host.
2. Verifying the Transferred File
After the transfer, the checksum of the local file was calculated and compared to the content of the checksum text file. An identical match confirmed a successful, corruption-free transfer.
3. Creating an External Backup
Following the 3-2-1 backup rule, an additional copy of the backup file was created on an external USB drive. This offline copy serves as the primary source for the upcoming migration and provides robust disaster recovery protection.
Preparing for the New Hardware
With the Domain Controller VM successfully backed up, checksum verified, and stored, preparations for the hardware upgrade were now ready. The next steps would involve researching the manufacturer’s website for properly accessing and upgrading the NVMe, and determining UEFI/BIOS steps for verifying successful NVMe recognition and changing the boot order (since leaving the original 256GB NVMe installed – new one is going into 2nd NVMe slot).
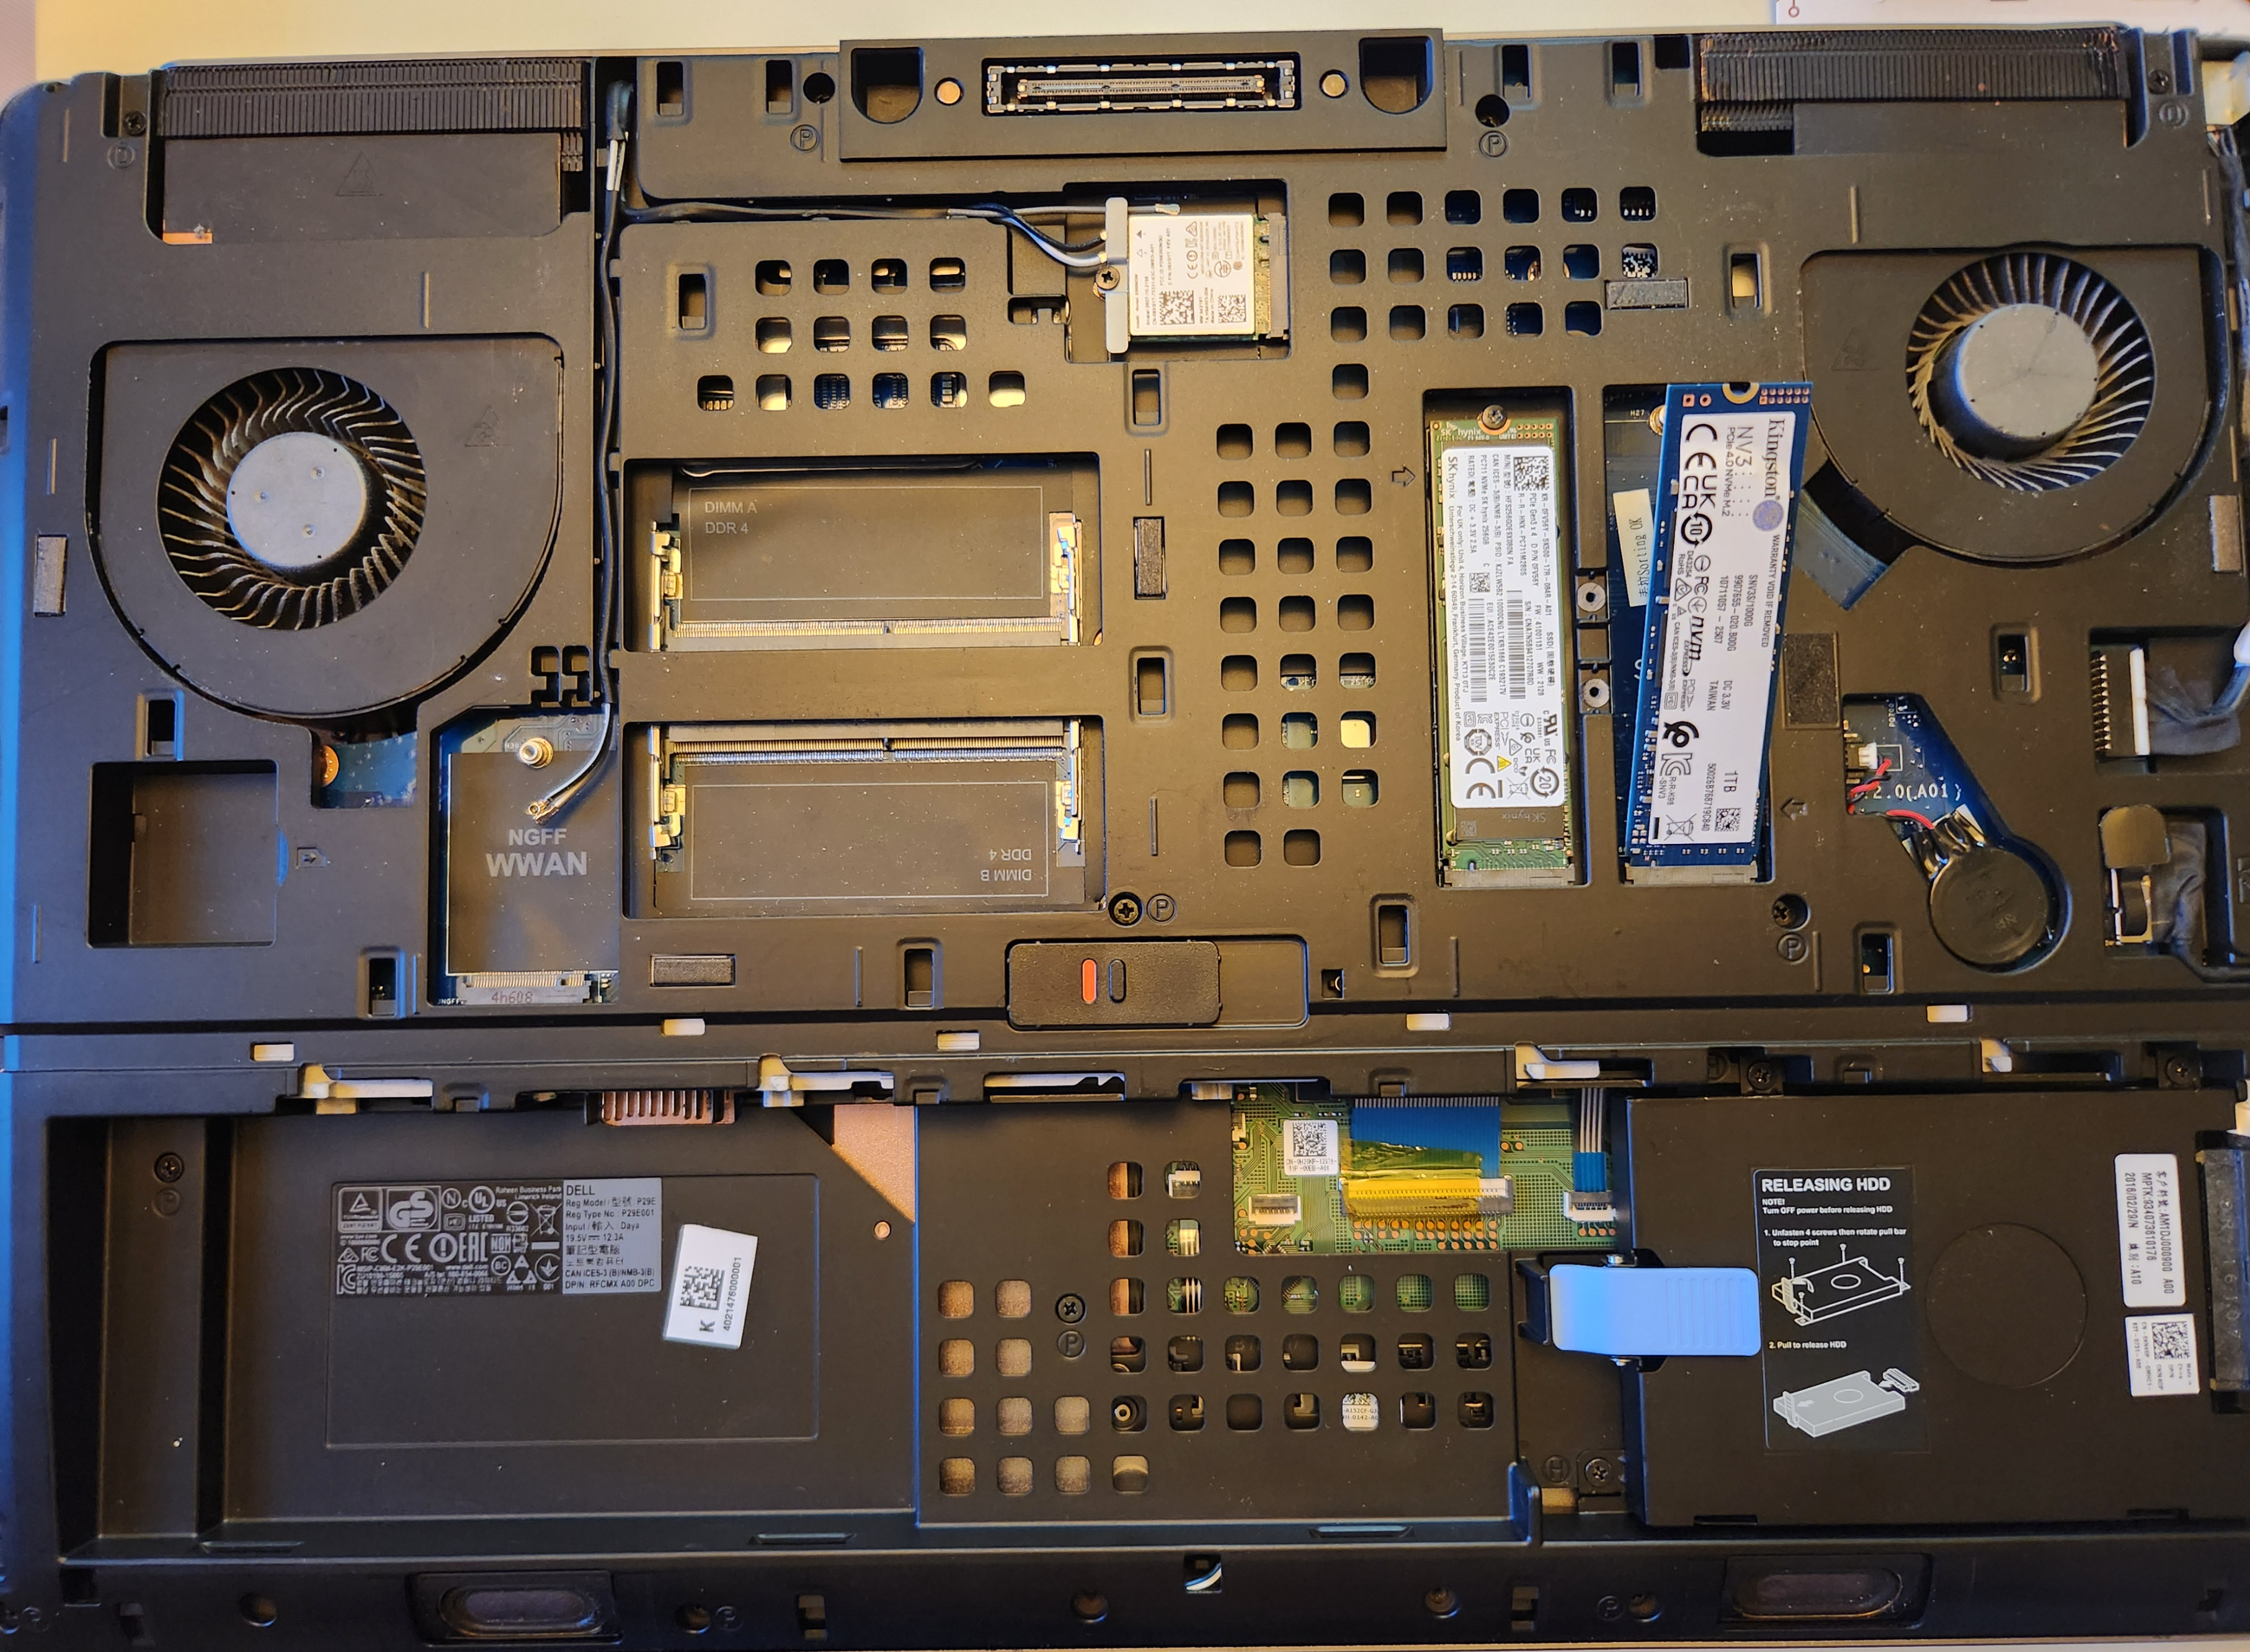 Figure 13: Dell Precision 7710 opened for NVMe installation, showing the second M.2 slot ready for the new drive.
Tip: Always Consult Official Documentation First
While there are plenty of tutorials, articles, and videos on the internet, always refer to the official manufacturer’s documentation as your first source. Dell’s Service Manual provides precise specifications for accessing internal components and proper installation procedures.
While awaiting delivery of the new Dell Precision & NVMe hardware, physically installing the NVMe drives was completed. After which, performing a bare-metal Proxmox installation on the new system will be outlined in the next guide.
Key Learnings & Takeaways
This comprehensive backup process provided an opportunity to apply enterprise-level data protection and change management practices in preparation for a critical infrastructure migration.
Pre-Migration Documentation is Non-Negotiable: The importance of thoroughly documenting the current state before any major change cannot be overstated. Capturing network configurations, performance baselines, and system health provides essential reference points for troubleshooting and verification. This systematic approach mirrors enterprise change management processes where documentation is required for rollback procedures and post-implementation reviews.
Understanding Backup Methods and Their Applications: Working with Proxmox
vzdumpreinforced the distinction between hypervisor-level and in-guest backups. For VM migrations between Proxmox hosts, hypervisor-level backups capture the complete VM state, including virtual hardware configurations, making them ideal for infrastructure moves. This knowledge directly applies to enterprise virtualization environments using VMware vSphere or Microsoft Hyper-V.Data Integrity Verification is Multi-Layered: Implementing both compression integrity testing (
zstd -t) and cryptographic checksums (SHA256) demonstrated that proper backup verification involves multiple validation methods. The combination ensures both file completeness and transfer accuracy—critical skills for any role involving data protection and disaster recovery.Active Directory Health Assessment Before Major Changes: Using
dcdiagto validate DC health before migration reinforced the importance of proactive system monitoring. While some warnings were identified, the process demonstrated how to triage issues appropriately—addressing critical problems immediately while documenting non-critical items for future resolution. This balance between immediate action and strategic planning is essential in production environments.
Next in Series: Installing Proxmox VE and Initial Network Configuration on the Dell Precision 7710